Nginx
![]()
nginx [engine x] 是一个 HTTP 和反向代理服务器,一个邮件代理服务器,一个通用的 TCP/UDP 代理服务器,最初由Igor Sysoev编写。很长一段时间以来,它一直在许多负载很重的俄罗斯网站上运行,包括 Yandex、 Mail.Ru、 VK和 Rambler。根据 Netcraft 的数据,nginx 在 2022 年 11 月服务或代理了 21.21% 的最繁忙站点。以下是一些成功案例: Dropbox、 Netflix、 Wordpress.com、 FastMail.FM。
Docker方式安装
xxxxxxxxxxdocker run --name nginx0 \-v /data/nginx/html:/usr/share/nginx/html:ro \-v /data/nginx/conf/nginx.conf:/etc/nginx/nginx.conf \-v /data/nginx/conf/conf.d/:/etc/nginx/conf.d/ \-v /data/nginx/log:/var/log/nginx \-v /etc/localtime:/etc/localtime:ro \-d --net="host" nginx:1.19.10
启动
xxxxxxxxxxdocker psdocker restart nginxdocker stop nginx
源码方式安装
nginx 源码 | nginx 安装脚本 | nginx 服务
xxxxxxxxxx# yum安装gcc gcc-c++和依赖yum install -y gcc gcc-c++yum install -y zlib zlib-devel pcre pcre-devel openssl openssl-devel# 查看openssl版本openssl version -a# 编译安装tar -zxvf nginx-1.*.tar.gz -C /usr/localcd /usr/local/nginx-1.*./configure --prefix=/usr/local/nginx \--with-pcre \--with-zlib \--with-openssl \--with-http_stub_status_module \--with-http_ssl_module \--with-http_realip_modulemakemake install# 创建符号链接ln -s /usr/local/nginx/sbin/nginx /usr/bin/nginx# 启动cd /usr/local/nginx/sbin./nginx -t./nginx./nginx -s reload./nginx -s stop# 查看 nginx 版本,编译参数./nginx -V
配置服务
xxxxxxxxxxcp -a nginx /etc/init.d/nginxchmod a+x /etc/init.d/nginxchkconfig nginx on
启动
xxxxxxxxxxservice nginx restartservice nginx statusservice nginx stop
常用代理配置
因为业务系统需求,需要对web服务作nginx代理,在不断的尝试过程中,简单总结了一下常见的nginx代理配置。
1. 最简反向代理配置
在http节点下,使用upstream配置服务地址,使用server的location配置代理映射。
xxxxxxxxxx { 10.0.0.2:8080; 2000;} { listen 80; 10.0.0.1; 1024;
/my/ { :///; $host:$server_port; }}通过该配置,访问nginx地址http://10.0.0.1:80/my的请求会被转发到my_server服务地址http://10.0.0.2:8080/。
需要注意的是,如果按照如下配置:
xxxxxxxxxx { 10.0.0.2:8080; 2000;} { listen 80; 10.0.0.1; 1024;
/my/ { ://; $host:$server_port; }}那么,访问nginx地址http://10.0.0.1:80/my的请求会被转发到my_server服务地址http://10.0.0.2:8080/my。这是因为proxy_pass参数中如果不包含url的路径,则会将location的pattern识别的路径作为绝对路径。
2. 重定向报文代理
即便配置了nginx代理,当服务返回重定向报文时(http code为301或302),会将重定向的目标url地址放入http response报文的header的location字段内。用户浏览器收到重定向报文时,会解析出该字段并作跳转。此时新的请求报文将直接发送给服务地址,而非nginx地址。为了能让nginx拦截此类请求,必须修改重定向报文的location信息。
xxxxxxxxxxlocation /my/ {    proxy_pass http://my_server;    proxy_set_header Host $host:$server_port;
    proxy_redirect / /my/;}
使用proxy_redirect可以修改重定向报文的location字段,例子中会将所有的根路径下的url代理到nginx的/my/路径下返回给用户。比如服务返回的重定向报文的location原始值为/login,那么经过nginx代理后,用户收到的报文的location字段为/my/login。此时,浏览器将会跳转到nginx的/my/login地址进行访问。
需要注意的是,服务返回的重定向报文的location字段有时会填写绝对路径(包含服务的ip/域名和端口),有时候会填写相对路径,此时需要根据实际情况进行甄别。
xxxxxxxxxx /my/ { ://; $host:$server_port;
:/// ://$host:$server_port/my/;}上述配置便是将my_server服务的根路径下的所有路径代理到nginx地址的/my/路径下。当nginx配置只有一个server时,http://$host:$server_port前缀可以省略。
3. 报文数据替换
使用nginx代理最牛(dan)逼(sui)的情况就是http响应报文内写死了服务地址或web绝对路径。写死服务地址的情况比较少见,但也偶尔存在。最棘手的是写死了web绝对路径,尤其是绝对路径都没有公共前缀。举个例子来说:
一般的web页面会包含如下类似路径:
- /public:用于静态页面资源,如js脚本/public/js,样式表/public/css,图片/public/img等。
- /static:和/public类似。
- /api:用于后台服务API接口。
- /login:用于登录验证。
- 其他。
对于这样的服务,可能的代理配置如下:
xxxxxxxxxxlocation /my/ {    proxy_pass http://my_server/;    proxy_set_header Host $host:$server_port;
proxy_redirect / /my/;}location /login/ { proxy_pass http://my_server/public; proxy_set_header Host $host:$server_port;}location /public/ { proxy_pass http://my_server/public; proxy_set_header Host $host:$server_port;}location /api/ { proxy_pass http://my_server/api; proxy_set_header Host $host:$server_port;}由于web页面或静态资源内写死了类似的绝对路径,那么对于用户来说,通过页面内的链接进行跳转时,都会请求到nginx服务对应的路径上。一旦存在另一个服务也包含类似的路径,也需要nginx进行代理,那么矛盾就出现了:访问nginx的同一个路径下的请求究竟转发给哪一个服务?
要解决这个问题,必须在用户收到报文前,将报文的数据中包含的绝对路径都添加统一的前缀,如/my/public,/my/api,/my/login,这样nginx代理配置则可以简化为:
xxxxxxxxxxlocation /my/ {    proxy_pass http://my_server/;    proxy_set_header Host $host:$server_port;
    proxy_redirect / /my/;}location /other/ {    proxy_pass http://other_server/;    proxy_set_header Host $host:$server_port;
proxy_redirect / /other/;}nginx的ngx_http_sub_module模块提供了类似的报文数据替换功能,该模块默认不会安装,需要在编译nginx时添加--with-http_sub_module参数,或者直接下载nginx的rpm包。
使用sub_filter对数据包进行替换的语法如下:
xxxxxxxxxxlocation /my/ {    proxy_pass http://my_server/;    proxy_set_header Host $host:$server_port;
    sub_filter 'href="/' 'href="/my/';    sub_filter 'src="/' 'src="/my/';    sub_filter_types text/html;    sub_filter_once  off;}
上述配置会将/my/下的所有响应报文内容的href="/替换为href="/my,以及src="/替换为src="/my,即为所有的绝对路径添加公共前缀。
注意,如果需要配置多个sub_filter,必须保证nginx是1.9.4版本之上的。
xxxxxxxxxxproxy_set_header Accept-Encoding "";Nginx 的 sub_filter 无法处理压缩过的请求, Nginx 自身也不会解压。禁用上游的压缩,对客户端的压缩不受影响。但是这样入站带宽就多很多了。sub_filter_types mime-type ...;指定响应哪些类型的响应,"*"匹配所有(mime-type 必须是配置文件mime.types文件中存在的)。
4. 总结
即便如此,sub_filter也不能解决所有问题。目前流行的js框架都会有自动渲染url的功能,也就是说,很多绝对路径并非写死在静态页面内,也是由js代码框架动态生成的,面对这样的情况,sub_filter也是无能为力了。对于这样的情况,笔者只能由衷地奉劝,还是安静的改代码吧!
配置proxy_pass时,可以实现URL路径的部分替换。
proxy_pass的目标地址,默认不带/,表示只代理域名,url和querystring部分不会变(把请求的path拼接到proxy_pass目标域名之后作为代理的URL)
如果在目标地址后增加/,则表示把path中location匹配成功的部分剪切掉之后再拼接到proxy_pass目标地址
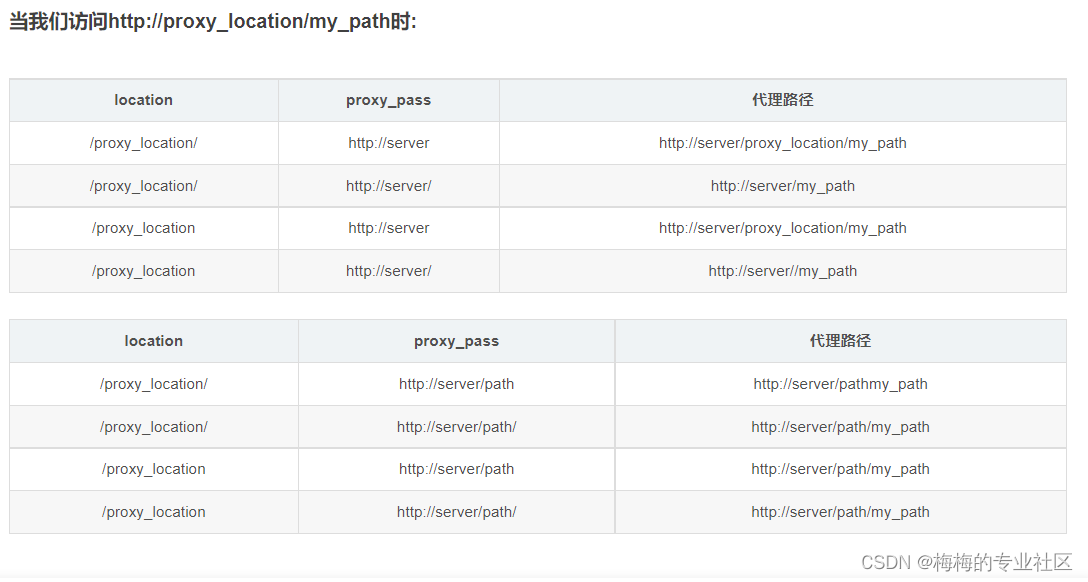
proxy_pass转发规则
一 location匹配路径末尾没有 /
此时proxy_pass后面的路径必须拼接location的路径:
xxxxxxxxxxlocation /sta{ proxy_redirect off; proxy_set_header Host $host; proxy_set_header X-Real-IP $remote_addr; proxy_set_header X-Forwarded-For $proxy_add_x_forwarded_for; proxy_pass http://192.168.1.31/sta;}注:这里也可以写成:“proxy_pass http://192.168.1.31/sta/;”。当然,不推荐使用上面这种写法
二 location匹配路径末尾有 /
此时proxy_pass后面的路径需要分为以下四种情况讨论:
(1)proxy_pass后面的路径只有域名且最后没有 /:
xxxxxxxxxxlocation /sta/{ proxy_redirect off; proxy_set_header Host $host; proxy_set_header X-Real-IP $remote_addr; proxy_set_header X-Forwarded-For $proxy_add_x_forwarded_for; proxy_pass http://192.168.1.31;}(2)proxy_pass后面的路径只有域名同时最后有 /:
xxxxxxxxxxlocation /sta/{ proxy_redirect off; proxy_set_header Host $host; proxy_set_header X-Real-IP $remote_addr; proxy_set_header X-Forwarded-For $proxy_add_x_forwarded_for; proxy_pass http://192.168.1.31/;}(3)proxy_pass后面的路径还有其他路径但是最后没有 /:
xxxxxxxxxxlocation /sta/{ proxy_redirect off; proxy_set_header Host $host; proxy_set_header X-Real-IP $remote_addr; proxy_set_header X-Forwarded-For $proxy_add_x_forwarded_for; proxy_pass http://192.168.1.31/abc;}(4)proxy_pass后面的路径还有其他路径同时最后有 /:
xxxxxxxxxxlocation /sta/{ proxy_redirect off; proxy_set_header Host $host; proxy_set_header X-Real-IP $remote_addr; proxy_set_header X-Forwarded-For $proxy_add_x_forwarded_for; proxy_pass http://192.168.1.31/abc/;}附:在nginx上面配置APK文件下载路径:
xxxxxxxxxxlocation ^~ /h5/appdownload/{ proxy_redirect off; proxy_set_header Host $host; proxy_set_header X-Real-IP $remote_addr; proxy_set_header X-Forwarded-For $proxy_add_x_forwarded_for; proxy_pass http://192.168.1.31/; proxy_set_header Cookie $http_cookie;}每次更新apk文件,只需要上传新的apk文件到192.168.1.31服务器,然后再更新对外的下载地址为http://test.com/h5/appdownload/newName.apk即可,并不需要更改nginx的任何配置
location 匹配规则
Nginx 的 location 实现了对请求的细分处理,有些 URI 返回静态内容,有些分发到后端服务器等,今天来彻底弄懂它的匹配规则
一个最简单的 location 的例子如下
xxxxxxxxxxserver {server_name website.com;location /admin/ {# The configuration you place here only applies to# http://website.com/admin/}}
location 支持的语法 location [=|~|~*|^~|@] pattern { ... },乍一看还挺复杂的,来逐个看一下。
location修饰符类型
「=」 修饰符:要求路径完全匹配
xxxxxxxxxxserver {server_name website.com;location = /abcd {[…]}}
http://website.com/abcd匹配http://website.com/ABCD可能会匹配 ,也可以不匹配,取决于操作系统的文件系统是否大小写敏感(case-sensitive)。ps: Mac 默认是大小写不敏感的,git 使用会有大坑。http://website.com/abcd?param1¶m2匹配,忽略 querystringhttp://website.com/abcd/不匹配,带有结尾的/http://website.com/abcde不匹配
「~」修饰符:区分大小写的正则匹配
xxxxxxxxxxserver {server_name website.com;location ~ ^/abcd$ {[…]}}
^/abcd$这个正则表达式表示字符串必须以/开始,以$结束,中间必须是abcd
http://website.com/abcd匹配(完全匹配)http://website.com/ABCD不匹配,大小写敏感http://website.com/abcd?param1¶m2匹配http://website.com/abcd/不匹配,不能匹配正则表达式http://website.com/abcde不匹配,不能匹配正则表达式
「~*」不区分大小写的正则匹配
xxxxxxxxxxserver {server_name website.com;location ~* ^/abcd$ {[…]}}
http://website.com/abcd匹配 (完全匹配)http://website.com/ABCD匹配 (大小写不敏感)http://website.com/abcd?param1¶m2匹配http://website.com/abcd/不匹配,不能匹配正则表达式http://website.com/abcde不匹配,不能匹配正则表达式
「^~」修饰符:前缀匹配 如果该 location 是最佳的匹配,那么对于匹配这个 location 的字符串, 该修饰符不再进行正则表达式检测。注意,这不是一个正则表达式匹配,它的目的是优先于正则表达式的匹配
「 」无修饰符:前缀匹配
「@」 定义命名location区段 这些区段客户段不能访问,只可以由内部产生的请求来访问,如try_files或error_page等
查找的顺序及优先级
当有多条 location 规则时,nginx 有一套比较复杂的规则,优先级如下:
- 精确匹配
= - 前缀匹配
^~(立刻停止后续的正则搜索) - 按文件中顺序的正则匹配
~或~* - 匹配不带任何修饰的前缀匹配。
这个规则大体的思路是
先精确匹配,没有则查找带有
^~的前缀匹配,没有则进行正则匹配,最后才返回前缀匹配的结果(如果有的话)如果上述规则不好理解,可以看下面的伪代码(非常重要)
xxxxxxxxxxfunction match(uri):rv = NULLif uri in exact_match:return exact_match[uri]if uri in prefix_match:if prefix_match[uri] is '^~':return prefix_match[uri]else:rv = prefix_match[uri] // 注意这里没有 return,且这里是最长匹配if uri in regex_match:return regex_match[uri] // 按文件中顺序,找到即返回return rv
一个简化过的Node.js写的代码如下
xxxxxxxxxxfunction ngx_http_core_find_location(uri, static_locations, regex_locations, named_locations, track) {let rc = null;let l = ngx_http_find_static_location(uri, static_locations, track);if (l) {if (l.exact_match) {return l;}if (l.noregex) {return l;}rc = l;}if (regex_locations) {for (let i = 0 ; i < regex_locations.length; i ++) {if (track) track(regex_locations[i].id);let n = null;if (regex_locations[i].rcaseless) {n = uri.match(new RegExp(regex_locations[i].name));} else {n = uri.match(new RegExp(regex_locations[i].name), "i");}if (n) {return regex_locations[i];}}}return rc;}
案例分析
案例 1
xxxxxxxxxxserver {server_name website.com;location /doc {return 701; # 用这样的方式,可以方便的知道请求到了哪里}location ~* ^/document$ {return 702; # 用这样的方式,可以方便的知道请求到了哪里}}curl -I website.com:8080/documentHTTP/1.1 702
按照上述的规则,第二个会有更高的优先级
案例2
xxxxxxxxxxserver {server_name website.com;location /document {return 701;}location ~* ^/document$ {return 702;}}curl -I website.com:8080/document
第二个匹配了正则表达式,优先级高于第一个普通前缀匹配
案例 3
xxxxxxxxxxserver {server_name website.com;location ^~ /doc {return 701;}location ~* ^/document$ {return 702;}}curl http://website.com/documentHTTP/1.1 701
第一个前缀匹配^~命中以后不会再搜寻正则匹配,所以会第一个命中
案例 4
xxxxxxxxxxserver {server_name website.com;location /docu {return 701;}location /doc {return 702;}}
curl -I website.com:8080/document 返回 HTTP/1.1 701,
xxxxxxxxxxserver {server_name website.com;location /doc {return 702;}location /docu {return 701;}}curl -I website.com:8080/document` 依然返回 `HTTP/1.1 701
前缀匹配下,返回最长匹配的 location,与 location 所在位置顺序无关
案例 5
xxxxxxxxxxserver {listen 8080;server_name website.com;location ~ ^/doc[a-z]+ {return 701;}location ~ ^/docu[a-z]+ {return 702;}}curl -I website.com:8080/document` 返回 `HTTP/1.1 701
把顺序换一下
xxxxxxxxxxserver {listen 8080;server_name website.com;location ~ ^/docu[a-z]+ {return 702;}location ~ ^/doc[a-z]+ {return 701;}}curl -I website.com:8080/document` 返回 `HTTP/1.1 702
正则匹配是使用文件中的顺序,找到返回
upstream负载均衡
如果Nginx没有仅仅只能代理一台服务器的话,那它也不可能像今天这么火,Nginx可以配置代理多台服务器,当一台服务器宕机之后,仍能保持系统可用。具体配置过程如下:
- 在http节点下,添加upstream节点。
xxxxxxxxxxupstream linuxidc {server 10.0.6.108:7080;server 10.0.0.85:8980;}
- 将server节点下的location节点中的proxy_pass配置为:http:// + upstream名称,即
"http://linuxidc".
xxxxxxxxxxlocation / {root html;index index.html index.htm;proxy_pass http://linuxidc;}
- 现在负载均衡初步完成了。upstream按照轮询(默认)方式进行负载,每个请求按时间顺序逐一分配到不同的后端服务器,如果后端服务器down掉,能自动剔除。虽然这种方式简便、成本低廉。但缺点是:可靠性低和负载分配不均衡。适用于图片服务器集群和纯静态页面服务器集群。
- 除此之外,upstream还有其它的分配策略,分别如下:
weight(权重)
指定轮询几率,weight和访问比率成正比,用于后端服务器性能不均的情况。如下所示,10.0.0.88的访问比率要比10.0.0.77的访问比率高一倍。
xxxxxxxxxxupstream linuxidc{server 10.0.0.77 weight=5;server 10.0.0.88 weight=10;}
ip_hash(访问ip)
每个请求按访问ip的hash结果分配,这样每个访客固定访问一个后端服务器,可以解决session的问题。
xxxxxxxxxxupstream favresin{ip_hash;server 10.0.0.10:8080;server 10.0.0.11:8080;}
fair(第三方)
按后端服务器的响应时间来分配请求,响应时间短的优先分配。与weight分配策略类似。
xxxxxxxxxxupstream favresin{server 10.0.0.10:8080;server 10.0.0.11:8080;fair;}
- url_hash(第三方)
按访问url的hash结果来分配请求,使每个url定向到同一个后端服务器,后端服务器为缓存时比较有效。
注意:在upstream中加入hash语句,server语句中不能写入weight等其他的参数,hash_method是使用的hash算法。
xxxxxxxxxxupstream resinserver{server 10.0.0.10:7777;server 10.0.0.11:8888;hash $request_uri;hash_method crc32;}
- upstream还可以为每个设备设置状态值,这些状态值的含义分别如下:
down 表示单前的server暂时不参与负载. weight 默认为1.weight越大,负载的权重就越大。 max_fails :允许请求失败的次数默认为1.当超过最大次数时,返回proxy_next_upstream 模块定义的错误. fail_timeout : max_fails次失败后,暂停的时间。 backup: 其它所有的非backup机器down或者忙的时候,请求backup机器。所以这台机器压力会最轻。
xxxxxxxxxxupstream bakend{ #定义负载均衡设备的Ip及设备状态ip_hash;server 10.0.0.11:9090 down;server 10.0.0.11:8080 weight=2;server 10.0.0.11:6060;server 10.0.0.11:7070 backup;}
stream模块实现四层协议转发
nginx从1.9.0开始,新增加了一个stream模块,用来实现四层协议的转发、代理或者负载均衡等。 stream模块的用法和http模块差不多,语法基本一致,支持server,hash, listen, proxy_pass等指令。 比如在内网有一个mysql服务,想暴露到公网上去使用,就可以通过nginx代理的方式通过nginx来进行内网mysql的访问。
1、编译或者升级nginx至版本1.9.0以上,编译过程中需带上--with-stream。
xxxxxxxxxx./configure --prefix=/opt/apps/nginx --with-streammake && make install
2、配置stream,定义代理192.168.1.20的3306端口映射为端口2333。
xxxxxxxxxx# vi /opt/apps/nginx/conf/nginx.confstream {server {listen 2333;proxy_pass 192.168.1.20:3306;}}
启用TCP反向代理日志
Nginx使用TCP反向代理日志配置不同于http 修改nginx配置文档/usr/local/nginx/conf/nginx.conf 设置日志格式 由于stream模块与http模块处于同一级,所有stream模块不能添加到http模块内,需单独配置。
xxxxxxxxxxstream {log_format proxy '$remote_addr [$time_local] ''$protocol $status $bytes_sent $bytes_received ''$session_time "$upstream_addr" ''"$upstream_bytes_sent" "$upstream_bytes_received" "$upstream_connect_time"';upstream pssers {server 192.168.102.131:350;}# 修改具体的tcp配置文档server {listen 350;proxy_pass pssers;error_log logs/pssers.error.log;access_log logs/pssers.access.log proxy;}
检查日志
xxxxxxxxxxtail -f logs/pssers.access.log123.57.18.63 [10/May/2021:11:12:02 +0800] TCP 200 33 162 0.044 "192.168.103.128:350" "162" "33" "0.001"123.57.18.63 [10/May/2021:11:12:05 +0800] TCP 200 33 162 0.086 "192.168.102.161:350" "162" "33" "0.001"
- 测试发现nginx会等待session结束才会记录到日志文件;
- session日志只是tcp层面的记录,包括session时间,发送接收字节数等等;
- session内部发送日志(比如一个socket连接建立起来以后,多次发送心跳数据)需要在应用层面才能记录;
支持 WebSocket
WebSocket 和 HTTP 虽然是不同协议,但是两者“握手”方式兼容。通过HTTP升级机制,使用HTTP的Upgrade和Connection协议头的方式可以将连接从HTTP升级为WebSocket。
xxxxxxxxxxproxy_http_version 1.1; # 反向代理发送的HTTP协议的版本是1.1,HTTP1.1支持长连接proxy_set_header Upgrade $http_upgrade;proxy_set_header Connection "upgrade";proxy_read_timeout 3600s; # 两次请求之间的间隔超过 3600s 后才关闭这个连接,默认的60s
禁止IP/非法域名访问
nginx 的 default_server 指令可以定义默认的 server 去处理一些没有成功匹配 server_name 的请求, 如果没有显式定义,则会选取第一个定义的 server 作为 default_server。nginx 批量载入 conf 配置时会按 ascii 排序载入。
xxxxxxxxxxserver {listen 80 default_server; #显式指定default_serverserver_name localhost; # 这里 _ 并不是重点 __ 也可以 ___也可以return 501;}
来源ip白名单限制
xxxxxxxxxxserver {...略...if ($remote_addr !~ ^(124.165.97.144|133.110.186.128|133.110.186.88)) {rewrite ^.*$ /maintence.php last;}}
Referer防盗链、CSRF攻击
# nginx 图片防盗链配置location ~* \.(jpg|jpeg|png|gif|ico|css|js)$ {valid_referers none blocked server_names *.mysite.com *.mydomain.com;if ($invalid_referer) {return 403;}}# nginx CSRF 攻击防护location /api {valid_referers none blocked server_names *.example.com;if ($invalid_referer) {return 403;}proxy_pass http://backend;}
目录访问
xxxxxxxxxx# 访问 http://www.xxx.com/computer 时,会访问 /usr/share/nginx/html/computer 目录location /computer {root /usr/share/nginx/html;# 把js当成 text/plain 处理types {text/plain js;}# 默认媒体类型改为 text/plaindefault_type text/plain;autoindex on; #开启nginx目录浏览功能autoindex_exact_size off; #显示精确字节大小还是显示友好可读的大小autoindex_localtime on; #显示文件修改时间为服务器本地时间autoindex_format html; # 输入格式,可选项为html、xml、json、jsonpcharset utf-8; # 保证以中文命名的文件显示不会乱码}
禁用TLS1.0、TLS1.1
最近HTTPS 证书到期了。从新申请新的证书后,通过SSL检测我的证书是否正确的时候,提示我们的网站安全性问题。
没有优先使用FS系列加密套件,降级为B
因为我是使用nginx,所以需要配置ssl链接的ciphers 就可以了。
解决 通过vim 打开你的 nginx.conf 文件 在里面添加下面的配置即可:
xxxxxxxxxxssl_certificate xx你的crt证书//主要添加下面的ssl_protocols TLSv1.2 TLSv1.3;ssl_ciphers ECDHE-RSA-AES128-GCM-SHA256:ECDHE:ECDH:AES:HIGH:!NULL:!aNULL:!MD5:!ADH:!RC4:!DH:!DHE;ssl_prefer_server_ciphers on;
扩展知识 SSL协议有sslv2, sslv3, tlsv1.0, tlsv1.1,tlsv1.2,tlsv 1.3。目前最新版本tlsv1.3,其它协议都存在各种安全漏洞。在每种SSL协议中,又包括了一系列的加密算法,也即是上面的 ssl_ciphers参数 。
ciphers是配置ssl证书所需的加密套件,基于OpenSSL。用户可以控制在协商TLS连接时要考虑的密码。使已知密码的名称根据libcurl构建TLS后端。
注意:从TLS 1.1开始需要jdk 1.7以上了。 如果你的jdk版本过低了。那还是尽快升级吧。否则安全性存在问题
访问 https://myssl.com 检测是否修改成功
概 述 检测部署SSL/TLS的服务是否符合行业最佳实践,PCI DSS支付卡行业安全标准,Apple ATS规范。
评级
ATS 合规 PCI DSS 合规
TLS 1.3 不支持 TLS 1.2 支持 TLS 1.1 不支持 TLS 1.0 不支持 SSL 3 不支持 SSL 2 不支持
proxy_buffer
顾名思义,proxy_buffer 是用于 proxy 模式的缓冲功能。本文介绍其基本用法。
buffer ,即缓冲区,它在 Nginx 上发挥的作用就是 启用一个缓冲区,先在这个缓冲区内进行存储,再把数据发送出去 。和在线观看视频有点类似,先把视频文件缓冲一部分到本地再开始播放。 若没有 buffer,数据将会直接从 Nginx 传输到客户端。假设如果客户端的加载速度足够快,你可以直接把 buffer 关掉,让数据尽可能快地到达客户端。 而使用 buffer,Nginx 将会临时存储后端 response 到缓冲区,然后慢慢把数据发送到客户端。启用 buffer 的好处在于可以把数据一次性地发送给目标,相较于即时传输可以节约出这部分带宽。 顺带一提,Nginx 全局配置中的 tcp_nopush 的作用就是 数据包会累计到一定大小之后才会发送 。而 tcp_nodelay 是尽快发送数据,所以若你启用了 buffer,建议关闭 tcp_nodelay。
下面总结下 nginx buffer 设置:
xxxxxxxxxxproxy_buffer_size 4k;proxy_buffering on;proxy_buffers 8 64k;proxy_busy_buffers_size 128k;proxy_max_temp_file_size 512k;
首先,这些参数都是针对每一个http request ,不是全局的。
proxy_buffer 配置
proxy_buffer 是用于 proxy 模式(一般也可称为反向代理)的 buffer 配置。Nginx 有另外一种适用于 server 模式的 buffer 配置,这里本帖不做介绍。 proxy_buffer 包括了以下配置项:(需注意,以下指定的数值都是针对每一个 http request 的上限,而不是对于整个 buffer 区指定的上限。)
proxy_buffer_size proxy_buffer_size 4k; Sets the size of the buffer used for reading the first part of the response received from the proxied server. This part usually contains a small response header. By default, the buffer size is equal to one memory page. This is either 4K or 8K, depending on a platform. It can be made smaller, however. 设置用于读取从后端服务器接收到的响应的第一部分的缓冲区大小。 这部分通常包含一个小的响应头。 默认情况下,缓冲区大小等于一内存页。 这是 4K 或 8K,具体取决于平台。它还设置得得更小。 它的值比 proxy_buffers 更低,不用设置太大。可参考官网默认值4k|8k proxy_buffer_size 有一点特殊在于,无论 proxy_buffering 是否开启,proxy_buffer_size 都会起作用。
proxy_buffering proxy_buffering on; 在 proxy_buffering 开启的时候,proxy_buffers 和 proxy_busy_buffers_size 才会起作用。
proxy_buffers proxy_buffers 4 8k; Sets the number and size of the buffers used for reading a response from the proxied server, for a single connection. By default, the buffer size is equal to one memory page. This is either 4K or 8K, depending on a platform. 为单个连接设置用于从代理服务器读取响应的缓冲区的数量和大小。 默认情况下,缓冲区大小等于一内存页。 这是 4K 或 8K,具体取决于平台。 这个可理解为就是缓冲区的大小。看缓存什么内容,如果是静态资源,那先看看静态资源的平均大小。一般比较大的基本是30kb,此时可填4 32k。具体数量和大小,是要根据系统总内存来设置。number x size的值不能太大,因为这个是一个请求的缓冲区大小,设置太大了,当并发请求很多的时候,内存上升很快,就会存在问题了。
proxy_busy_buffers_size proxy_busy_buffers_size 12k; When buffering of responses from the proxied server is enabled, limits the total size of buffers that can be busy sending a response to the client while the response is not yet fully read. In the meantime, the rest of the buffers can be used for reading the response and, if needed, buffering part of the response to a temporary file. By default, size is limited by the size of two buffers set by the proxy_buffer_size and proxy_buffers directives. 当启用来自后端服务器的响应缓冲时,限制在响应尚未完全读取时可能忙于向客户端发送响应的缓冲区的总大小。 同时,其余缓冲区可用于读取响应,并在需要时将部分响应缓冲到临时文件。 默认情况下,大小受 proxy_buffer_size 和 proxy_buffers 指令设置的两个缓冲区的大小限制。 nginx在收到服务器数据后,会分配一部分缓冲区来用于向客户端发送数据。这个缓冲区大小是由proxy_busy_buffers_size决定的。大小通常是proxy_buffers单位大小的两倍。官网默认是8k|16k。
proxy_temp_file_write_size Limits the size of data written to a temporary file at a time, when buffering of responses from the proxied server to temporary files is enabled. By default, size is limited by two buffers set by the proxy_buffer_size and proxy_buffers directives. The maximum size of a temporary file is set by the proxy_max_temp_file_size directive. 当启用缓冲从代理服务器到临时文件的响应时,限制一次写入临时文件的数据大小。 默认情况下,大小受 proxy_buffer_size 和 proxy_buffers 指令设置的两个缓冲区限制。 临时文件的最大大小由 proxy_max_temp_file_size 指令设置。 当nginx收到服务器响应后,把数据一次性写入临时文件的大小。
proxy_max_temp_file_size 限制了每个请求写入的临时文件的最大值。
proxy_set_header
nginx的ngx_http_proxy_module模块实现反向代理的需求。其中proxy_set_header指令就是该模块需要读取的配置文件。在这里,所有设置的值的含义和http请求同中的含义完全相同,除了Host外还有X-Forward-For。
Host的含义是表明请求的主机名,因为nginx作为反向代理使用,而如果后端真是的服务器设置有类似防盗链或者根据http请求头中的host字段来进行路由或判断功能的话,如果反向代理层的nginx不重写请求头中的host字段,将会导致请求失败【默认反向代理服务器会向后端真实服务器发送请求,并且请求头中的host字段应为proxy_pass指令设置的服务器】。
同理,X_Forward_For字段表示该条http请求是有谁发起的?如果反向代理服务器不重写该请求头的话,那么后端真实服务器在处理时会认为所有的请求都来在反向代理服务器,如果后端有防攻击策略的话,那么机器就被封掉了。
因此,在配置用作反向代理的nginx中一般会增加两条配置,修改http的请求头:
xxxxxxxxxxproxy_set_header Host $http_host;proxy_set_header X-Forward-For $remote_addr;
这里的$http_host和$remote_addr都是nginx的导出变量,可以在配置文件中直接使用。如果Host请求头部没有出现在请求头中,则$http_host值为空,但是$host值为主域名。因此,一般而言,会用$host代替$http_host变量,从而避免http请求中丢失Host头部的情况下Host不被重写的失误。
X-Forwarded-For:简称XFF头,它代表客户端,也就是HTTP的请求端真实的IP,只有在通过了HTTP 代理或者负载均衡服务器时才会添加该项。 它不是RFC中定义的标准请求头信息,在squid缓存代理服务器开发文档中可以找到该项的详细介绍。标准格式如下:X-Forwarded-For: client1, proxy1, proxy2。
这一HTTP头一般格式如下:
xxxxxxxxxxX-Forwarded-For: client1, proxy1, proxy2
其中的值通过一个 逗号+空格 把多个IP地址区分开, 最左边(client1)是最原始客户端的IP地址, 代理服务器每成功收到一个请求,就把 请求来源IP地址添加到右边。 在上面这个例子中,这个请求成功通过了三台代理服务器:proxy1, proxy2 及 proxy3。请求由client1发出,到达了proxy3(proxy3可能是请求的终点)。请求刚从client1中发出时,XFF是空的,请求被发往proxy1;通过proxy1的时候,client1被添加到XFF中,之后请求被发往proxy2;通过proxy2的时候,proxy1被添加到XFF中,之后请求被发往proxy3;通过proxy3时,proxy2被添加到XFF中,之后请求的的去向不明,如果proxy3不是请求终点,请求会被继续转发。
鉴于伪造这一字段非常容易,应该谨慎使用X-Forwarded-For字段。正常情况下XFF中最后一个IP地址是最后一个代理服务器的IP地址, 这通常是一个比较可靠的信息来源。
官网关于proxy_set_header的说明如下:
xxxxxxxxxxSyntax语 法: proxy_set_header field value;Default默认值: proxy_set_header Host $proxy_host;proxy_set_header Connection close;Context上下文: http, server, location
Allows redefining or appending fields to the request header passed to the proxied server. The value can contain text, variables, and their combinations. These directives are inherited from the previous level if and only if there are no proxy_set_header directives defined on the current level. By default, only two fields are redefined: 允许 重新定义或者添加字段 传递给后端服务器的请求头。该值可以包含文本、 变量及其组合。当且仅当在当前级别中没有定义任何 proxy_set_header 指令时,这些指令才从上一层继承。默认情况下,只重新定义两个字段:
xxxxxxxxxxproxy_set_header Host $proxy_host;proxy_set_header Connection close;
如果不想改变请求头“Host”的值,可以这样来设置: proxy_set_header Host $http_host;
但是,如果客户端请求头中没有携带这个头部,那么传递到后端服务器的请求也不含这个头部。 这种情况下,更好的方式是使用$host变量——它的值在请求包含“Host”请求头时为“Host”字段的值,在请求未携带“Host”请求头时为虚拟主机的主域名: proxy_set_header Host $host;
此外,服务器名可以和后端服务器的端口一起传送: proxy_set_header Host $host:$proxy_port;
如果某个请求头的值为空,那么这个请求头将不会传递给后端服务器: proxy_set_header Accept-Encoding "";
4proxy_set_header X-Real-IP $remote_addr; 将$remote_addr的值放进变量X-Real-IP中,此变量名可变,$remote_addr的值为客户端的ip
5proxy_set_header X-Forwarded-For $remote_addr; 6proxy_set_header X-Forwarded-For $proxy_add_x_forwarded_for; 在只有一个代理服务器的转发的情况下,两者的X-Forwarded-For值⼀致,都可以真实的显示出客户端原始ip,但是区别在于: $proxy_add_x_forwarded_for变量包含客户端请求头中的"X-Forwarded-For",与$remote_addr两部分,他们之间用逗号分开。
举个例子: user -> nginx 1 -> nginx 2 -> website 在第一台nginx中,使用 proxy_set_header X-Forwarded-For $proxy_add_x_forwarded_for; 现在的$proxy_add_x_forwarded_for变量的"X-Forwarded-For"部分是空的,所以只有$remote_addr,而$remote_addr的值是用户的ip,于是赋值以后,X-Forwarded-For变量的值就是用户的真实的ip地址了。
到了第二台nginx,使用 proxy_set_header X-Forwarded-For $proxy_add_x_forwarded_for; 现在的$proxy_add_x_forwarded_for变量,X-Forwarded-For部分包含的是用户的真实ip,$remote_addr部分的值是上一台nginx的ip地址,于是通过这个赋值以后现在的X-Forwarded-For的值就变成了:“用户的真实ip, 第一台nginx的ip”。
综上,一般情况下,反向代理的标准配置:
xxxxxxxxxxproxy_set_header Host $host;proxy_set_header X-Real-IP $remote_addr;proxy_set_header X-Forwarded-For $proxy_add_x_forwarded_for;
扩展一下:
xxxxxxxxxxproxy_set_header Host $host;proxy_set_header X-Real-IP $remote_addr;proxy_set_header X-Real-Port $remote_port;proxy_set_header X-Forwarded-Proto $scheme;proxy_set_header X-Forwarded-Uri $request_uri;proxy_set_header X-Forwarded-For $proxy_add_x_forwarded_for;
nginx中$host、$http_host和$proxy_host区别 变量 是否显示端口 值 $host 不显示端口 浏览器请求的ip,不显示端口 $http_host 端口存在则显示 浏览器请求的ip和端口号 $proxy_host 默认80端口不显示,其它显示 被代理服务的ip和端口号
$remote_addr:前一节点的IP,并不一定是用户的真实IP。
$proxy_host:代理服务器请求的后端服务器的ip,后端服务器有可能还是代理服务器。 $proxy_port:代理服务器请求的后端服务器的端口。
$http_x_real_ip:获取前一节点的X-Real-IP的值。 $http_x_forwarded_for:获取前一节点的X-Forwarded-For的值。 $proxy_add_x_forwarded_for变量包含$http_x_forwarded_for与$remote_addr两部分,他们之间用逗号分开。
proxy_redirect
今天在做nginx反向代理apache的时候出了一点点问题,原来后端apache用的端口是8080通过反向代理后,使用wireshark抓包发现location头域数值为http://192.168.1.154:8080/wuman/ 如果把这个返回给客户端肯定是不可以的,看起来别扭而且还暴露了apache的具体信息
所以在这里用到了nginx的proxy_redirect指定修改被代理服务器返回的响应头中的location头域跟refresh头域数值
以下是截取nginx的一小段配置文档
xxxxxxxxxxserver {listen 80;server_name www.boke.com;location / {proxy_pass http://192.168.1.154:8080;proxy_redirect off;}}
此时我们通过curl查看结果得出
xxxxxxxxxx[root@localhost nginx]# curl -I http://www.boke.com/wumanHTTP/1.1 301 Moved PermanentlyServer: nginxDate: Thu, 24 Dec 2015 12:02:00 GMTContent-Type: text/html; charset=iso-8859-1Connection: keep-aliveLocation: http://192.168.1.154:8080/wuman/
这里location为带有后端服务器实际地址跟端口的响应头信息这样在实际线上是不允许的所以这里我们打算通过proxy_redirect将被代理服务器的响应头中的location字段进行修改后返回给客户端
xxxxxxxxxxserver {listen 80;server_name www.boke.com;location / {proxy_pass http://192.168.1.154:8080;proxy_redirect http://192.168.1.154:8080/wuman/ http://www.boke.com/wuman/;}server {listen 80;server_name www.boke.com;location / {proxy_pass http://192.168.1.154:8080;proxy_redirect ~^http://192.168.1.154:8080(.*) http://www.boke.com$1;}
则curl查看返回结果
xxxxxxxxxx[root@localhost nginx]# curl -I http://www.boke.com/wumanHTTP/1.1 301 Moved PermanentlyServer: nginxDate: Thu, 24 Dec 2015 12:08:34 GMTContent-Type: text/html; charset=iso-8859-1Connection: keep-aliveLocation: http://www.boke.com/wuman/
此时查看location已经变成了我们想要的结果了。 此时通过replacement 301重定向到了我们新的页面
出处: proxy_redirect 语法:proxy_redirect [ default|off|redirect replacement ] 默认值:proxy_redirect default 使用字段:http, server, location
如果需要修改从被代理服务器传来的应答头中的"Location"和"Refresh"字段,可以用这个指令设置。
假设被代理服务器返回Location字段为: http://localhost:8000/two/some/uri/
这个指令:proxy_redirect http://localhost:8000/two/ http://frontend/one/;
将Location字段重写为http://frontend/one/some/uri/。
在代替的字段中可以不写服务器名:
proxy_redirect http://localhost:8000/two/ /;
这样就使用服务器的基本名称和端口,即使它来自非80端口。
如果使用“default”参数,将根据location和proxy_pass参数的设置来决定。
例如下列两个配置等效:
xxxxxxxxxxlocation /one/ {proxy_pass http://upstream:port/two/;proxy_redirect default;}location /one/ {proxy_pass http://upstream:port/two/;proxy_redirect http://upstream:port/two/ /one/;}
在指令中可以使用一些变量:
xxxxxxxxxxproxy_redirect http://localhost:8000/ http://$host:$server_port/;
这个指令有时可以重复:
xxxxxxxxxxproxy_redirect default;proxy_redirect http://localhost:8000/ /;proxy_redirect ; /;
参数off将在这个字段中禁止所有的proxy_redirect指令:
xxxxxxxxxxproxy_redirect off;proxy_redirect default;proxy_redirect http://localhost:8000/ /;proxy_redirect ; /;
利用这个指令可以为被代理服务器发出的相对重定向增加主机名:
xxxxxxxxxxproxy_redirect / /;
将被代理服务器发出的重定向http协议的location改为https协议:
xxxxxxxxxxproxy_redirect ~^http://([^:]+)(:\d+)?(.*)$ https://$1$2$3;
fpm
这里要先声明一下,针对Nginx的php安装和针对apache的php安装是有区别的,因为Nginx中的php是以fastcgi的方式结合nginx的,可以理解为nginx代理了php的fastcgi,而apache是把php作为自己的模块来调用的。
phpinfo()获取的Server API也是不一样的: Server API Apache 2.0 Handler Server API FPM/FastCGI
部署php-fpm
xxxxxxxxxx#配置文件cp /usr/local/php/etc/php-fpm.conf.default /usr/local/php/etc/php-fpm.conf#检验配置是否正确/usr/local/php/sbin/php-fpm -t#开机启动cp /root/lamp/extract.pkg/php-5.6.30/sapi/fpm/init.d.php-fpm /etc/init.d/php-fpmchmod 755 /etc/init.d/php-fpmchkconfig php-fpm on#启动php-fpmservice php-fpm start#检测是否启动:ps -ef |grep php-fpmroot 23568 1 0 05:04 ? 00:00:00 php-fpm: master process (/usr/local/php/etc/php-fpm.conf)nobody 23569 23568 0 05:04 ? 00:00:00 php-fpm: pool wwwnobody 23570 23568 0 05:04 ? 00:00:00 php-fpm: pool wwwroot 23592 1646 0 05:04 pts/0 00:00:00 grep php-fpm#查看进程netstat -ant |grep 9000tcp 0 0 127.0.0.1:9000 0.0.0.0:* LISTEN
配置转发
xxxxxxxxxxserver {listen 80;server_name thskhtest.shgsec.com;root /var/www/html;index index.php;location / {try_files $uri $uri/ /index.php?$query_string;}location ~ \.php$ {# 通过tcp socket通信fastcgi_pass 127.0.0.1:9000;# 通过unix socket通信,可以减少不必要的 tcp 开销fastcgi_pass unix:/run/php/php7.2-fpm.sock;fastcgi_index index.php;fastcgi_param SCRIPT_FILENAME $document_root$fastcgi_script_name;include fastcgi_params;}}
http跳转https
一、rewrite/return方法
xxxxxxxxxx1) 下面是将所有的http请求通过rewrite重写到https上。例如将所有的dev.wangshibo.com域名的http访问强制跳转到https。下面配置均可以实现:配置1:server {listen 80;server_name dev.wangshibo.com;index index.html index.php index.htm;access_log /usr/local/nginx/logs/8080-access.log main;error_log /usr/local/nginx/logs/8080-error.log;rewrite ^(.*)$ https://$host$1 permanent; //这是ngixn早前的写法,现在还可以使用。location ~ / {root /var/www/html/8080;index index.html index.php index.htm;}}================================================================上面的跳转配置rewrite ^(.*)$ https://$host$1 permanent;也可以改为下面rewrite ^/(.*)$ http://dev.wangshibo.com/$1 permanent;或者rewrite ^ http://dev.wangshibo.com$request_uri? permanent;================================================================配置2:server {listen 80;server_name dev.wangshibo.com;index index.html index.php index.htm;access_log /usr/local/nginx/logs/8080-access.log main;error_log /usr/local/nginx/logs/8080-error.log;return 301 https://$server_name$request_uri; //这是nginx最新支持的写法location ~ / {root /var/www/html/8080;index index.html index.php index.htm;}}配置3:这种方式适用于多域名的时候,即访问wangshibo.com的http也会强制跳转到https://dev.wangshibo.com上面server {listen 80;server_name dev.wangshibo.com wangshibo.com *.wangshibo.com;index index.html index.php index.htm;access_log /usr/local/nginx/logs/8080-access.log main;error_log /usr/local/nginx/logs/8080-error.log;if ($host ~* "^wangshibo.com$") {rewrite ^/(.*)$ https://dev.wangshibo.com/ permanent;}location ~ / {root /var/www/html/8080;index index.html index.php index.htm;}}配置4:下面是最简单的一种配置server {listen 80;server_name dev.wangshibo.com;index index.html index.php index.htm;access_log /usr/local/nginx/logs/8080-access.log main;error_log /usr/local/nginx/logs/8080-error.log;if ($host = "dev.wangshibo.com") {rewrite ^/(.*)$ http://dev.wangshibo.com permanent;}location ~ / {root /var/www/html/8080;index index.html index.php index.htm;}}
二、497状态码方法
非标准443端口的https情况下使用的强转配置方式
xxxxxxxxxx497 - normal request was sent to HTTPS解释:当网站只允许https访问时,当用http访问时nginx会报出497错误码思路:利用error_page命令将497状态码的链接重定向到https://dev.wangshibo.com这个域名上配置实例:如下访问dev.wangshibo.com或者wangshibo.com的http都会被强制跳转到httpsserver {listen 80;server_name dev.wangshibo.com wangshibo.com *.wangshibo.com;index index.html index.php index.htm;access_log /usr/local/nginx/logs/8080-access.log main;error_log /usr/local/nginx/logs/8080-error.log;error_page 497 https://$host$uri?$args;location ~ / {root /var/www/html/8080;index index.html index.php index.htm;}}也可以将80和443的配置放在一起:server {listen 127.0.0.1:443; #ssl端口listen 127.0.0.1:80; #用户习惯用http访问,加上80,后面通过497状态码让它自动跳到443端口server_name dev.wangshibo.com;#为一个server{......}开启ssl支持ssl on;#指定PEM格式的证书文件ssl_certificate /etc/nginx/wangshibo.pem;#指定PEM格式的私钥文件ssl_certificate_key /etc/nginx/wangshibo.key;#让http请求重定向到https请求error_page 497 https://$host$uri?$args;location ~ / {root /var/www/html/8080;index index.html index.php index.htm;}}
如果遇到非标准443端口的https情况下,则http到https的强转配置就需要使用上面这种497状态码的方式了。如下:
xxxxxxxxxxserver {listen 9443 ssl;server_name www.kevin.com;error_page 497 https://$server_name:9443$request_uri;ssl_certificate /etc/nginx/cert/kevin.crt;ssl_certificate_key /etc/nginx/cert/kevin.key;.........这样访问http://www.kevin.com:9443 就会自动跳转到https://www.kevin.com:9443。这种方式直接配置https端口就可以,不需要再配置http端口。
三、meta刷新方法
xxxxxxxxxx上述的方法均会耗费服务器的资源,可以借鉴百度使用的方法:巧妙的利用meta的刷新作用,将http跳转到https可以基于http://dev.wangshibo.com的虚拟主机路径下写一个index.html,内容就是http向https的跳转将下面的内容追加到index.html首页文件内[root@localhost ~]# cat /var/www/html/8080/index.html<html><meta http-equiv="refresh" content="0;url=https://dev.wangshibo.com/"></html>[root@localhost ~]# cat /usr/local/nginx/conf/vhosts/test.confserver {listen 80;server_name dev.wangshibo.com wangshibo.com *.wangshibo.com;index index.html index.php index.htm;access_log /usr/local/nginx/logs/8080-access.log main;error_log /usr/local/nginx/logs/8080-error.log;#将404的页面重定向到https的首页error_page 404 https://dev.wangshibo.com/;location ~ / {root /var/www/html/8080;index index.html index.php index.htm;}}
四、proxy_redirec方式
xxxxxxxxxx解决办法:# re-write redirects to http as to https, example: /homeproxy_redirect http:// https://;
这里分享一个nginx反代tomcat,并且http强制跳转至https的配置示例(这里访问http://zrx.wangshibo.com和访问http://172.29.34.33:8080/zrx/结果是一样的)
xxxxxxxxxx[root@BJLX_34_33_V vhosts]# cat zrx.confserver {listen 80;server_name zrx.wangshibo.com;index index.html index.php index.htm;access_log logs/access.log;error_log logs/error.log;return 301 https://$server_name$request_uri;location ~ / {root /data/nginx/html;index index.html index.php index.htm;}}[root@BJLX_34_33_V vhosts]# cat ssl-zrx.confupstream tomcat8 {server 172.29.34.33:8080 max_fails=3 fail_timeout=30s;}server {listen 443;server_name zrx.wangshibo.com;ssl on;### SSL log files ###access_log logs/ssl-access.log;error_log logs/ssl-error.log;### SSL cert files ###ssl_certificate ssl/wangshibo.cer;ssl_certificate_key ssl/wangshibo.key;ssl_session_timeout 5m;location / {proxy_pass http://tomcat8/zrx/;proxy_next_upstream error timeout invalid_header http_500 http_502 http_503;proxy_set_header Host $host;proxy_set_header X-Real-IP $remote_addr;proxy_set_header X-Forwarded-For $proxy_add_x_forwarded_for;proxy_set_header X-Forwarded-Proto https;proxy_redirect off;}}
auth_basic登录认证
有时候我们通过nginx搭建了一台文件服务器, 一般来讲是公开的, 但我们又希望该服务器不让他人看到, 有人可能会搭建一个登录系统, 但是太麻烦, 也没太大必要, 比较简单的做法是配置Basic Auth登录认证
纯后台的应用都可以加nginx basic auth提高安全性
htpasswd是Apache密码生成工具,Nginx支持auth_basic认证,因此我门可以将生成的密码用于Nginx中
xxxxxxxxxxsudo apt-get install apache2-utilssudo yum -y install httpd-toolscd /usr/local/nginx/conf/passwd#生成密码htpasswd -c ./passwdfile username#执行上命令后会要求输入两次密码,./passwdfile 是在当前目录下创建密码文件passwdfile ,username即为需要设置的账号# 或者使用openssl生成密码openssl passwd <your_password># 也可以使用更为复杂的 Hash 规则进行生成,如使用 apr1 算法:openssl passwd -apr1 <your_password>
在Nginx配置文件中(通常是server段内),加入如下两行,reload Nginx生效
xxxxxxxxxxserver{listen 80 default_server reuseport;server_name _;index index.html index.htm index.php;root /home/wwwroot/default;auth_basic "请输入账号密码"; #这里是验证时的提示信息# auth_basic_user_file /usr/local/nginx/conf/passwd/ip_passwdfile;auth_basic_user_file /usr/share/nginx/html/htpasswd;}
再访问站点,提示需要输入用户名和密码才可以访问。
对于这种有HTTP Basic Authentication协议验证的页面,curl/wget的使用方法
curl -u username:password URLwget --http-user= --http-passwd=passwd URL