MySQL
![]()
安装
RPM安装MYSQL5.7
x# 1、解压安装包tar -xvf mysql-5.7.*.x86_64.rpm-bundle.tar2、移除已经安装的版本[root@RHEL6 ~]# rpm -qa | grep mysqlmysql-libs-5.1.73-5.el6_6.x86_64[root@RHEL6 ~]# rpm -e --nodeps $(rpm -qa | grep mysql)如果不移除的话,会提示有冲突,如下:file /usr/share/mysql/czech/errmsg.sys from install of mysql-community-common-5.7.*.x86_64 conflicts with file from package mysql-libs-5.1.73-5.el6_6.x86_64# 3、安装顺序rpm -ivh mysql-community-common-5.7.*.x86_64.rpmrpm -ivh mysql-community-libs-5.7.*.x86_64.rpmrpm -ivh mysql-community-client-5.7.*.x86_64.rpmrpm -ivh mysql-community-server-5.7.*.x86_64.rpmrpm -ivh mysql-community-devel-5.7.*.x86_64.rpmrpm -ivh mysql-community-devel-5.7.*.x86_64.rpm# 4、验证版本[root@RHEL6 ~]# mysql --versionmysql Ver 14.14 Distrib 5.7.17, for Linux (x86_64) using EditLine wrapper# 5、重启[root@RHEL6 ~]# service mysqld startInitializing MySQL database: [ OK ]Installing validate password plugin: [ OK ]Starting mysqld: [ OK ]# 6、查看初始管理员密码查看初始管理员密码,下面的命令适用于 RHEL, Oracle Linux, CentOS, and Fedora 平台:grep 'temporary password' /var/log/mysqld.logSLES平台使用下面的命令:grep 'temporary password' /var/log/mysql/mysqld.log[root@RHEL6 ~]# grep 'temporary password' /var/log/mysqld.log2017-04-06T14:43:50.315931Z 1 [Note] A temporary password is generated for root@localhost: fU5:59+nqio(所以密码是:fU5:59+nqio(# 7、连接数据库[root@RHEL6 ~]# mysql -uroot -pEnter password:Welcome to the MySQL monitor. Commands end with ; or \g.Your MySQL connection id is 4Server version: 5.7.17Copyright (c) 2000, 2016, Oracle and/or its affiliates. All rights reserved.Oracle is a registered trademark of Oracle Corporation and/or itsaffiliates. Other names may be trademarks of their respectiveowners.Type 'help;' or '\h' for help. Type '\c' to clear the current input statement.mysql># 8、修改密码并授权MySQL5.6增加了密码强度验证插件validate_password,相关参数设置的较为严格。使用了该插件会检查设置的密码是否符合当前设置的强度规则,若不满足则拒绝设置。影响的语句和函数有:create user,grant,set password,password(),old password。ERROR 1819 (HY000): Your password does not satisfy the current policy requirements可以修改密码策略解决。-- 修改密码策略:set global validate_password_policy=0;set global validate_password_length=4;ALTER USER 'root'@'localhost' IDENTIFIED BY '10jqka';ALTER USER 'root'@'%' IDENTIFIED BY '10jqka';-- 授权 -- WITH GRANT OPTION: 被授予的用户也可把此对象权限授予其他用户或角色GRANT ALL PRIVILEGES ON *.* TO 'root'@'%' WITH GRANT OPTION;GRANT ALL PRIVILEGES ON *.* TO 'root'@'%' IDENTIFIED BY '123456' WITH GRANT OPTION;flush privileges;mysql -uroot -p123456
RPM安装MYSQL8
xxxxxxxxxx# 1、解压安装包tar -xf mysql-8.*.rpm-bundle.tar# 2、移除已经安装的版本yum remove -y mariadb-libsyum install -y openssl-devel perl net-tools# 3、安装顺序rpm -ivh mysql-community-common-8.*.x86_64.rpmrpm -ivh mysql-community-client-plugins-8.*.x86_64.rpmrpm -ivh mysql-community-libs-8.*.x86_64.rpmrpm -ivh mysql-community-libs-compat-8.*.x86_64.rpmrpm -ivh mysql-community-client-8.*.x86_64.rpmrpm -ivh mysql-community-devel-8.*.x86_64.rpmrpm -ivh mysql-community-server-8.*.x86_64.rpm# 4、验证版本mysql --version# 5、重启systemctl enable mysqldsystemctl start mysqldsystemctl status mysqldsystemctl stop mysqld# 6、查看初始管理员密码grep 'temporary password' /var/log/mysqld.log# 7、连接数据库mysql -uroot -p# 8、修改密码并授权ALTER USER 'root'@'localhost' IDENTIFIED WITH mysql_native_password BY '1qaz@WSX';-- 修改密码策略:set global validate_password.policy=0;set global validate_password.length=4;ALTER USER 'root'@'localhost' IDENTIFIED WITH mysql_native_password BY '123456';CREATE USER 'root'@'%' IDENTIFIED WITH mysql_native_password BY '123456';-- 授权GRANT ALL ON *.* TO 'root'@'%' WITH GRANT OPTION;flush privileges;mysql -uroot -p123456
源码5.1升级到rpm5.7
centos7通过yum装完mysql,使用grep 'temporary password' /var/log/mysqld.log找不到root密码 打开mysqld.log中根本没有temporary password
1.删除原来安装过的mysql残留的数据(这一步非常重要,问题就出在这)
rm -rf /var/lib/mysql
2.重启mysqld服务
systemctl restart mysqld
3.再去找临时密码
grep 'temporary password' /var/log/mysqld.log
4.如果报错如下,则可能是mysql 5.1的链接没有清理干净rm -f /usr/local/bin/mysql
xxxxxxxxxx[root@localhost mysql5.7]# mysql -uroot -pEnter password:ERROR 2002 (HY000): Can't connect to local MySQL server through socket '/tmp/mysql.sock' (2)
其他操作
查看基础信息
xxxxxxxxxx#查看mysql版本select version();#查看文件路径show global variables like "%datadir%";#查看 Mysql 配置文件加载顺序mysqld --verbose --help |grep -A 5 'Default options'#查看binlog文件列表show binary logs;#查看当前正在写入的binlog文件show master status;#查看指定binlog文件的内容show binlog events [in 'log_name'] [FROM pos] [limit [offset,] row_count]show binlog events in 'mysql-bin.000005' FROM 194 LIMIT 2
查看io
在MySQL中,可以使用SHOW GLOBAL STATUS查询来监控IO性能,以下是一些关键的状态变量和它们的含义:
Innodb_data_reads: 总共进行的InnoDB数据文件读取次数。Innodb_data_writes: 总共进行的InnoDB数据文件写入次数。Innodb_os_log_written: 写入日志文件的总字节数。Key_reads: 从磁盘读取索引块的次数。Key_writes: 将索引块写入磁盘的次数。
可以使用以下SQL命令查询这些状态:
xxxxxxxxxxSHOW GLOBAL STATUS LIKE 'Innodb_%';SHOW GLOBAL STATUS LIKE 'Key_%';
还使用iotop命令可以实时监控进程对IO的使用情况。
查看数据库/表容量
1.查看所有数据库容量大小 MB
xxxxxxxxxxselecttable_schema as '数据库',sum(table_rows) as '记录数',sum(truncate(data_length/1024/1024, 2)) as '数据容量(MB)',sum(truncate(index_length/1024/1024, 2)) as '索引容量(MB)'from information_schema.tablesgroup by table_schemaorder by sum(data_length) desc, sum(index_length) desc;
1.查看所有数据库容量大小GB
xxxxxxxxxxselecttable_schema as '数据库',sum(table_rows) as '记录数',sum(truncate(data_length/1024/1024/1024, 2)) as '数据容量(GB)',sum(truncate(index_length/1024/1024/1024, 2)) as '索引容量(GB)'from information_schema.tablesgroup by table_schemaorder by sum(data_length) desc, sum(index_length) desc;
2.查看所有数据库各表容量大小 MB
xxxxxxxxxxselecttable_schema as '数据库',table_name as '表名',table_rows as '记录数',truncate(data_length/1024/1024, 2) as '数据容量(MB)',truncate(index_length/1024/1024, 2) as '索引容量(MB)'from information_schema.tablesorder by data_length desc, index_length desc;
2.查看所有数据库各表容量大小 GB
xxxxxxxxxxselecttable_schema as '数据库',table_name as '表名',table_rows as '记录数',truncate(data_length/1024/1024/1024, 2) as '数据容量(GB)',truncate(index_length/1024/1024/1024, 2) as '索引容量(GB)'from information_schema.tablesorder by data_length desc, index_length desc;
3.查看指定数据库容量大小 MB
xxxxxxxxxxselecttable_schema as '数据库',sum(table_rows) as '记录数',sum(truncate(data_length/1024/1024, 2)) as '数据容量(MB)',sum(truncate(index_length/1024/1024, 2)) as '索引容量(MB)'from information_schema.tableswhere table_schema='mysql';
3.查看指定数据库容量大小 GB
xxxxxxxxxxselecttable_schema as '数据库',sum(table_rows) as '记录数',sum(truncate(data_length/1024/1024/1024, 2)) as '数据容量(GB)',sum(truncate(index_length/1024/1024/1024, 2)) as '索引容量(GB)'from information_schema.tableswhere table_schema='mysql';
4.查看指定数据库各表容量大小 MB
xxxxxxxxxxselecttable_schema as '数据库',table_name as '表名',table_rows as '记录数',truncate(data_length/1024/1024, 2) as '数据容量(MB)',truncate(index_length/1024/1024, 2) as '索引容量(MB)'from information_schema.tableswhere table_schema='mysql'order by data_length desc, index_length desc;
4.查看指定数据库各表容量大小 GB
xxxxxxxxxxselecttable_schema as '数据库',table_name as '表名',table_rows as '记录数',truncate(data_length/1024/1024/1024, 2) as '数据容量(GB)',truncate(index_length/1024/1024/1024, 2) as '索引容量(GB)'from information_schema.tableswhere table_schema='mysql'order by data_length desc, index_length desc;
查看 / kill 当前线程
xxxxxxxxxx-- Info 段中仅显示每个语句的前 100 个字符。show processlist;show full processlist;mysql> SHOW FULL PROCESSLIST\G*************************** 1. row ***************************Id: 1User: system userHost:db: NULLCommand: ConnectTime: 1030455 以秒为单位State: Waiting for master to send eventInfo: NULL
显示哪些线程正在运行。您也可以使用 mysqladmin processlist 语句得到此信息。如果您有SUPER权限,您可以看到所有线程。否则,您只能看到您自己的线程(也就是,与您正在使用的MySQL账户相关的线程)。
每个 mysql 连接都在一个单独的线程中运行。 可以使用 KILL processlist_id 语句来终止线程。
xxxxxxxxxxkill [CONNECTION | QUERY] processlist_idkill processlist_id;
KILL 允许使用可选的 CONNECTION 或 QUERY 修饰符:
KILL CONNECTION 与不带修饰符的 KILL 相同:它在终止连接正在执行的任何语句后终止与给定 processlist_id 关联的连接。
KILL QUERY 终止连接当前正在执行的语句,但保持连接本身完好无损。
还可以使用 mysqladmin processlist and mysqladmin kill 命令来检查和 杀死线程。
SHOW PROCESSLIST 输出包含以下几列:文档
Id连接标识符。
User发出该语句的 MySQL 用户。 “系统用户”值是指由服务器生成的用于内部处理任务的非客户端线程,例如,延迟行处理程序线程或副本主机上使用的 I/O 或 SQL 线程。 对于“系统用户”,“主机”列中没有指定主机。 “未经身份验证的用户”是指已与客户端连接关联但尚未进行客户端用户身份验证的线程。
event_scheduler是指监视计划事件的线程 (see Section 23.4, “Using the Event Scheduler”).Host发出该语句的客户端的主机名(
system user除外,它没有主机)。db线程的默认数据库,如果未选择任何数据库,则为“NULL”。
Command线程代表客户端执行的命令类型,如果会话空闲则为“睡眠”。
Time线程处于当前状态的时间(以秒为单位)。 对于副本 SQL 线程,该值是上次复制事件的时间戳与副本主机的实时时间之间的秒数。
State指示线程正在执行的操作、事件或状态。
大多数状态对应于非常快速的操作。 如果线程保持给定状态很多秒,则可能存在需要调查的问题。
Info线程正在执行的语句,如果没有执行任何语句,则为“NULL”。 该语句可能是发送到服务器的语句,也可能是最里面的语句(如果该语句执行其他语句)。
SHOW PROCESSLIST 命令中最关键的就是state列,mysql列出的状态主要有以下几种:
Checking table 正在检查数据表(这是自动的)。 Closing tables 正在将表中修改的数据刷新到磁盘中,同时正在关闭已经用完的表。这是一个很快的操作,如果不是这样的话,就应该确认磁盘空间是否已经满了或者磁盘是否正处于重负中。 Connect Out 复制从服务器正在连接主服务器。 Copying to tmp table on disk 由于临时结果集大于tmp_table_size,正在将临时表从内存存储转为磁盘存储以此节省内存。 Creating tmp table 正在创建临时表以存放部分查询结果。 deleting from main table 服务器正在执行多表删除中的第一部分,刚删除第一个表。 deleting from reference tables 服务器正在执行多表删除中的第二部分,正在删除其他表的记录。 Flushing tables 正在执行FLUSH TABLES,等待其他线程关闭数据表。 Killed 发送了一个kill请求给某线程,那么这个线程将会检查kill标志位,同时会放弃下一个kill请求。MySQL会在每次的主循环中检查kill标志位,不过有些情况下该线程可能会过一小段才能死掉。如果该线程程被其他线程锁住了,那么kill请求会在锁释放时马上生效。 Locked 被其他查询锁住了。 Sending data 正在处理SELECT查询的记录,同时正在把结果发送给客户端。 Sorting for group 正在为GROUP BY做排序。 Sorting for order 正在为ORDER BY做排序。 Opening tables 这个过程应该会很快,除非受到其他因素的干扰。例如,在执ALTER TABLE或LOCK TABLE语句行完以前,数据表无法被其他线程打开。正尝试打开一个表。 Removing duplicates 正在执行一个SELECT DISTINCT方式的查询,但是MySQL无法在前一个阶段优化掉那些重复的记录。因此,MySQL需要再次去掉重复的记录,然后再把结果发送给客户端。 Reopen table 获得了对一个表的锁,但是必须在表结构修改之后才能获得这个锁。已经释放锁,关闭数据表,正尝试重新打开数据表。 Repair by sorting 修复指令正在排序以创建索引。 Repair with keycache 修复指令正在利用索引缓存一个一个地创建新索引。它会比Repair by sorting慢些。 Searching rows for update 正在讲符合条件的记录找出来以备更新。它必须在UPDATE要修改相关的记录之前就完成了。 Sleeping 正在等待客户端发送新请求. System lock 正在等待取得一个外部的系统锁。如果当前没有运行多个mysqld服务器同时请求同一个表,那么可以通过增加--skip-external-locking参数来禁止外部系统锁。 Upgrading lock INSERT DELAYED正在尝试取得一个锁表以插入新记录。 Updating 正在搜索匹配的记录,并且修改它们。 User Lock 正在等待GET_LOCK()。 Waiting for tables 该线程得到通知,数据表结构已经被修改了,需要重新打开数据表以取得新的结构。然后,为了能的重新打开数据表,必须等到所有其他线程关闭这个表。以下几种情况下会产生这个通知:FLUSH TABLES tbl_name, ALTER TABLE, RENAME TABLE, REPAIR TABLE, ANALYZE TABLE,或OPTIMIZE TABLE。 waiting for handler insert INSERT DELAYED已经处理完了所有待处理的插入操作,正在等待新的请求。大部分状态对应很快的操作,只要有一个线程保持同一个状态好几秒钟,那么可能是有问题发生了,需要检查一下。 还有其他的状态没在上面中列出来,不过它们大部分只是在查看服务器是否有存在错误是才用得着。
删除表
从执行速度上来说: drop > truncate >> DELETE
delete
DELETEfrom TABLE_NAME where xxx1)DELETE属于数据库DML操作语言,只删除数据不删除表的结构,会走事务,执行时会触发trigger;
2)在 InnoDB 中,DELETE其实并不会真的把数据删除,mysql 实际上只是给删除的数据打了个标记为已删除,因此 delete 删除表中的数据时,表文件在磁盘上所占空间不会变小,存储空间不会被释放,只是把删除的数据行设置为不可见。虽然未释放磁盘空间,但是下次插入数据的时候,仍然可以重用这部分空间(重用 → 覆盖)。
3)DELETE执行时,会先将所删除数据缓存到rollback segement中,事务commit之后生效;
4)delete from table_name删除表的全部数据,对于MyISAM 会立刻释放磁盘空间,InnoDB 不会释放磁盘空间;
5)对于delete from table_name where xxx 带条件的删除, 不管是InnoDB还是MyISAM都不会释放磁盘空间;
6)delete操作以后使用 optimize table table_name 会立刻释放磁盘空间。不管是InnoDB还是MyISAM 。所以要想达到释放磁盘空间的目的,delete以后执行optimize table 操作。
truncate
Truncate table TABLE_NAME1)truncate:属于数据库DDL定义语言,不走事务,原数据不放到 rollback segment 中,操作不触发 trigger。
执行后立即生效,无法找回执行后立即生效,无法找回执行后立即生效,无法找回
2)truncate table table_name 立刻释放磁盘空间 ,不管是 InnoDB和MyISAM 。truncate table其实有点类似于drop table 然后creat,只不过这个create table 的过程做了优化,比如表结构文件之前已经有了等等。所以速度上应该是接近drop table的速度;
3)truncate能够快速清空一个表。并且重置auto_increment的值。
但对于不同的类型存储引擎需要注意的地方是:
对于MyISAM,truncate会重置auto_increment(自增序列)的值为1。而delete后表仍然保持auto_increment。对于InnoDB,truncate会重置auto_increment的值为1。delete后表仍然保持auto_increment。但是在做delete整个表之后重启MySQL的话,则重启后的auto_increment会被置为1。也就是说,InnoDB的表本身是无法持久保存auto_increment。delete表之后auto_increment仍然保存在内存,但是重启后就丢失了,只能从1开始。实质上重启后的auto_increment会从 SELECT 1+MAX(ai_col) FROM t 开始。
4)小心使用 truncate,尤其没有备份的时候,如果误删除线上的表,记得及时联系我国民航,哈哈,开玩笑啦!!此操作一定慎重。
drop
Droptable Tablename1)drop:属于数据库DDL定义语言,同Truncate;
执行后立即生效,无法找回执行后立即生效,无法找回执行后立即生效,无法找回
2)drop table table_name 立刻释放磁盘空间 ,不管是 InnoDB 和 MyISAM; drop 语句将删除表的结构被依赖的约束(constrain)、触发器(trigger)、索引(index); 依赖于该表的存储过程/函数将保留,但是变为 invalid 状态。
3)小心使用 drop ,要删表跑路的兄弟,请在做好跑路准备后在执行操作,办错事是要付出代价的,谨慎操作!
删除所有表
xxxxxxxxxxSELECT concat('DROP TABLE IF EXISTS ', table_name, ';')FROM information_schema.tablesWHERE table_schema = 'mydb';
mydb换成你想删除的数据库的名字 这样可以生成一个批量处理的sql语句,你需要再运行一次这个结果集 就可以删除所有的表而不删除数据库了
删除带有外键关联的表
drop表时报错:Cannot delete or update a parent row: a foreign key constraint fails.出现这个报错的原因是:想要删除的数据或表与其他数据或表拥有主外键关系,Mysql规定,为了维护表结构的稳定,禁止执行该操作,即外键约束失败
xxxxxxxxxxSET foreign_key_checks = 0; // 先设置外键约束检查关闭drop table table1;detele from table where ; // 删除表或数据SET foreign_key_checks = 1; // 开启外键约束检查,以保持表结构完整性
导入导出
导出
1.mysql导出数据库
xxxxxxxxxxmysqldump -u 用户名 -p 数据库名 > 导出的文件名mysqldump -u root -p db_name > /root/test_db.sql
2.mysql导出数据库一个表
xxxxxxxxxxmysqldump -u 用户名 -p 数据库名 表名 > 导出的文件名mysqldump -u root -p db_name tb_name > /root/test_tables.sql
mysqldump为了加快导入导出,默认把数据都缩减在一行里面。查看和修改不方便,为此,我们可以使用 --skip-extended-insert 选项来使导出的数据,是多行插入形式的。
xxxxxxxxxxmysqldump --skip-extended-insert -u 用户名 -p 数据库名 表名 > 导出的文件名mysqldump --skip-extended-insert -u root -p db_name tb_name > /root/test_tables.sql
说明:默认Mysqldump导出的SQL文件中不但包含了导出的数据,还包括导出数据库中所有数据表的结构信息。 另外使用Mysqldump导出的SQL文件如果不带绝对路径,默认是保存在bin目录下的。
3.mysql导出数据表结构
xxxxxxxxxxmysqldump -u root -p --no-data db_name tb_name > /root/mysql_user.sqlEnter password: ******
说明:Mysqldump命令参数 –no-data顾名思义代表Mysqldump导出的数据中不含有INSERT数据,仅仅只是Mysql数据库表user的结构信息。对于这个参数你也可以使用-d来表示。
4.mysql导出指定条件的数据
xxxxxxxxxxmysqldump -u root -p "--where= user= 'root'" db_name tb_name > /root/mysql_user.sql2017/5/242017/5/24Enter password: ******
说明:在这个Mysqldump导出实例中,通过设定Mysqldump命令参数 –where=conditions设定导出的INSERT数据条件为user表中user字段为root的INSERT记录。通过这个参数你可以根据需要选用Mysqldump导出自己想要的数据,非常方便。注意在这个where选项前后都需要使用双引号,具体的条件可以使用单引号,否则在解析Mysqldump命令行参数时会出错,另外你也可以指定多个where参数。
导入
1.mysql source导入sql文件
xxxxxxxxxxmysql -uroot -p10jqka -h127.0.0.1create database db_name;use db_name;source /root/test_tables.sql
2.mysql重定向导入sql文件
xxxxxxxxxxmysql -uroot -p10jqka -h127.0.0.1 << EOFcreate database db_name;EOFmysql -uroot -p10jqka -h127.0.0.1 db_name < /root/test_tables.sql
shell脚本中执行mysql命令
xxxxxxxxxxmysql -uroot -p10jqka -h127.0.0.1 -e "use db_name;select * from tb_name;quit"mysql -uroot -p10jqka -h127.0.0.1 -t -e "use db_name;select * from tb_name;quit" > /root/mysql.log# 如果select 包含sql关键字,如 select DESC,不能使用 `DESC`,要使用 \`DESC\`。
help
xxxxxxxxxx[appadmin@iZuf6grebmbepcfxp8aezwZ cqy]$ mysql --helpmysql Ver 8.0.26 for Linux on x86_64 (Source distribution)Copyright (c) 2000, 2021, Oracle and/or its affiliates.Oracle is a registered trademark of Oracle Corporation and/or itsaffiliates. Other names may be trademarks of their respectiveowners.Usage: mysql [OPTIONS] [database]-?, --help Display this help and exit.-I, --help Synonym for -?--auto-rehash Enable automatic rehashing. One doesn't need to use'rehash' to get table and field completion, but startupand reconnecting may take a longer time. Disable with--disable-auto-rehash.(Defaults to on; use --skip-auto-rehash to disable.)-A, --no-auto-rehashNo automatic rehashing. One has to use 'rehash' to gettable and field completion. This gives a quicker start ofmysql and disables rehashing on reconnect.--auto-vertical-outputAutomatically switch to vertical output mode if theresult is wider than the terminal width.-B, --batch Don't use history file. Disable interactive behavior. 以制表符分隔的方式输出结果(Enables --silent.)--bind-address=name IP address to bind to.--binary-as-hex Print binary data as hex. Enabled by default forinteractive terminals.--character-sets-dir=nameDirectory for character set files.--column-type-info Display column type information.-c, --comments Preserve comments. Send comments to the server. Thedefault is --skip-comments (discard comments), enablewith --comments.-C, --compress Use compression in server/client protocol.-#, --debug[=#] This is a non-debug version. Catch this and exit.--debug-check This is a non-debug version. Catch this and exit.-T, --debug-info This is a non-debug version. Catch this and exit.-D, --database=name Database to use.--default-character-set=nameSet the default character set.--delimiter=name Delimiter to be used.--enable-cleartext-pluginEnable/disable the clear text authentication plugin.-e, --execute=name Execute command and quit. (Disables --force and historyfile.)-E, --vertical Print the output of a query (rows) vertically.-f, --force Continue even if we get an SQL error.--histignore=name A colon-separated list of patterns to keep statementsfrom getting logged into syslog and mysql history.-G, --named-commandsEnable named commands. Named commands mean this program'sinternal commands; see mysql> help . When enabled, thenamed commands can be used from any line of the query,otherwise only from the first line, before an enter.Disable with --disable-named-commands. This option isdisabled by default.-i, --ignore-spaces Ignore space after function names.--init-command=name SQL Command to execute when connecting to MySQL server.Will automatically be re-executed when reconnecting.--local-infile Enable/disable LOAD DATA LOCAL INFILE.-b, --no-beep Turn off beep on error.-h, --host=name Connect to host.--dns-srv-name=name Connect to a DNS SRV resource-H, --html Produce HTML output.-X, --xml Produce XML output.--line-numbers Write line numbers for errors.(Defaults to on; use --skip-line-numbers to disable.)-L, --skip-line-numbersDon't write line number for errors.-n, --unbuffered Flush buffer after each query.--column-names Write column names in results.(Defaults to on; use --skip-column-names to disable.)-N, --skip-column-namesDon't write column names in results. 不输出列名(字段名)--sigint-ignore Ignore SIGINT (CTRL-C).-o, --one-database Ignore statements except those that occur while thedefault database is the one named at the command line.--pager[=name] Pager to use to display results. If you don't supply anoption, the default pager is taken from your ENV variablePAGER. Valid pagers are less, more, cat [> filename],etc. See interactive help (\h) also. This option does notwork in batch mode. Disable with --disable-pager. Thisoption is disabled by default.-p, --password[=name]Password to use when connecting to server. If password isnot given it's asked from the tty.-P, --port=# Port number to use for connection or 0 for default to, inorder of preference, my.cnf, $MYSQL_TCP_PORT,/etc/services, built-in default (3306).--prompt=name Set the mysql prompt to this value.--protocol=name The protocol to use for connection (tcp, socket, pipe,memory).-q, --quick Don't cache result, print it row by row. This may slowdown the server if the output is suspended. Doesn't usehistory file.-r, --raw Write fields without conversion. Used with --batch.--reconnect Reconnect if the connection is lost. Disable with--disable-reconnect. This option is enabled by default.(Defaults to on; use --skip-reconnect to disable.)-s, --silent Be more silent. Print results with a tab as separator,each row on new line.-S, --socket=name The socket file to use for connection.--server-public-key-path=nameFile path to the server public RSA key in PEM format.--get-server-public-keyGet server public key--ssl-mode=name SSL connection mode.--ssl-ca=name CA file in PEM format.--ssl-capath=name CA directory.--ssl-cert=name X509 cert in PEM format.--ssl-cipher=name SSL cipher to use.--ssl-key=name X509 key in PEM format.--ssl-crl=name Certificate revocation list.--ssl-crlpath=name Certificate revocation list path.--tls-version=name TLS version to use, permitted values are: TLSv1, TLSv1.1,TLSv1.2, TLSv1.3--ssl-fips-mode=nameSSL FIPS mode (applies only for OpenSSL); permittedvalues are: OFF, ON, STRICT--tls-ciphersuites=nameTLS v1.3 cipher to use.-t, --table Output in table format. 以可读的表格形式的输出结果--tee=name Append everything into outfile. See interactive help (\h)also. Does not work in batch mode. Disable with--disable-tee. This option is disabled by default.-u, --user=name User for login if not current user.-U, --safe-updates Only allow UPDATE and DELETE that uses keys.-U, --i-am-a-dummy Synonym for option --safe-updates, -U.-v, --verbose Write more. (-v -v -v gives the table output format).-V, --version Output version information and exit.-w, --wait Wait and retry if connection is down.--connect-timeout=# Number of seconds before connection timeout.--max-allowed-packet=#The maximum packet length to send to or receive fromserver.--net-buffer-length=#The buffer size for TCP/IP and socket communication.--select-limit=# Automatic limit for SELECT when using --safe-updates.--max-join-size=# Automatic limit for rows in a join when using--safe-updates.--show-warnings Show warnings after every statement.-j, --syslog Log filtered interactive commands to syslog. Filtering ofcommands depends on the patterns supplied via histignoreoption besides the default patterns.--plugin-dir=name Directory for client-side plugins.--default-auth=name Default authentication client-side plugin to use.--binary-mode By default, ASCII '\0' is disallowed and '\r\n' istranslated to '\n'. This switch turns off both features,and also turns off parsing of all clientcommands except\C and DELIMITER, in non-interactive mode (for inputpiped to mysql or loaded using the 'source' command).This is necessary when processing output from mysqlbinlogthat may contain blobs.--connect-expired-passwordNotify the server that this client is prepared to handleexpired password sandbox mode.--network-namespace=nameNetwork namespace to use for connection via tcp with aserver.--compression-algorithms=nameUse compression algorithm in server/client protocol.Valid values are any combination of'zstd','zlib','uncompressed'.--zstd-compression-level=#Use this compression level in the client/server protocol,in case --compression-algorithms=zstd. Valid range isbetween 1 and 22, inclusive. Default is 3.--load-data-local-dir=nameDirectory path safe for LOAD DATA LOCAL INFILE to readfrom.Default options are read from the following files in the given order:/etc/my.cnf /etc/mysql/my.cnf ~/.my.cnfThe following groups are read: mysql clientThe following options may be given as the first argument:--print-defaults Print the program argument list and exit.--no-defaults Don't read default options from any option file,except for login file.--defaults-file=# Only read default options from the given file #.--defaults-extra-file=# Read this file after the global files are read.--defaults-group-suffix=#Also read groups with concat(group, suffix)--login-path=# Read this path from the login file.
完整备份表
xxxxxxxxxx-- 1. 这种方法不能处理外键之类的情况create new_database.new_table (select * from old_database.old_table);-- 2. 先导出表结构,并创建新表和表结构,再insertcreate table new_table like old_table;insert into new_database.new_table (select * from old_database.old_table);-- 恢复:删除旧表,再把新表改名drop table old_table;rename table new_table to old_table;-- 对比前后表的行数select count(1) from old_database.old_table;select count(1) from new_database.new_table;
修改表名
xxxxxxxxxxrename table old_table to new_table;-- to|as可以省略,SQLite仅支持to的写法alter table old_table rename [to|as] new_table;
添加索引
新表添加索引
xxxxxxxxxxcreate table t_dept(no int not null primary key,name varchar(20) null,index index_no(no) -- 普通索引unique index index_no(no) -- 唯一索引fulltext index index_no(no) -- 全文索引key index_no_name(no,name) -- 多列索引)
create方式添加索引
xxxxxxxxxxcreate index index_name on t_dept(name); -- 普通索引create unique index index_name on t_dept(name);create fulltext index index_name on t_dept(name);create index index_name_no on t_dept(name,no);
alter方式添加索引
xxxxxxxxxxalter table t_dept add index index_name(name); -- 普通索引alter table t_dept add unique index index_name(name);alter table t_dept add fulltext index_name(name);alter table t_dept add index index_name_no(name,no);
拼接双引号
xxxxxxxxxx
慢查询
慢查询,顾名思义,执行很慢的查询。有多慢?超过long_query_time参数设定的时间阈值(默认10s),就被认为是慢的,是需要优化的。慢查询被记录在慢查询日志里。慢查询日志默认是不开启的。如果需要优化SQL语句,就可以开启这个功能,它可以让你很容易地知道哪些语句是需要优化的。
1 show variables like 'slow_query_log';查询是否开启慢查询日志 【开启慢查询sql:set global slow_query_log = 1/on;】 【关闭慢查询sql:set global slow_query_log = 0/off;】 2 show variables like 'log_queries_not_using_indexes';查询未使用索引是否开启记录慢查询日志 【开启记录未使用索引sql:set global log_queries_not_using_indexes=1/on】 【关闭记录未使用索引sql:set global log_queries_not_using_indexes=1/off】 3 show variables like 'long_query_time';查询超过多少秒的记录到慢查询日志中 【设置超1秒就记录慢查询sql:set global long_query_time= 1;设置超1秒就记录】
mysql 慢查询
- 慢查询日志的打开 正常情况下,只需要在配置文件中增加slow_query_log = 1配置,即打开慢查询日志,未指定slow_query_log_file的情况下,会自动生成一个以主机名+‘slow’.log 的文件。 show variables like '%slow_query%';
- 默认情况下记录慢查询的时间阈值为10s show variables like '%long_query_time%'; --long_query_time 指定超过多少时长的查询需要被记录;
show variables like '%log_output%'
show variables like '%min_examined_row_limit%'; --min_examined_row_limit 超过指定行数的扫描查询开关;默认0,代表不限制扫描函数;
方式一设置开启MySQL慢日志参数:无需重启即可生效,但是重启会导致设置失效 set global long_query_time=0.1; set global log_queries_not_using_indexes=on; set global slow_query_log = on; set log_output = 'FILE,TABLE';
方式二需要修改配置文件 my.ini /my.cnf 配置文件中配置:需要重启 MySQL 才可以生效,命令为 service mysqld restart slow_query_log = 1 slow_query_log_file = /var/lib/mysql/slow_query_log_202123.log log_output = table long_query_time = 1
可以将慢查询日志同时记录在文件以及 mysql.slow_log
查询慢查询日志:select * from mysql.slow_log; select CONVERT(sql_text USING utf8) sql_text from mysql.slow_log;
start_time 为执行时间,user_host 为用户的主机名,query_time 为查询所花费的时间, lock_time 为该查询使用锁的时间,rows_sent 为这条查询返回了多少数据给客户端, rows_examined 表示这条语句扫描了多少行,db 为数据库,sql_text 为这条 SQL, thread_id 为执行这条查询的线程 id。
查询慢sql 日志文件保存在哪里:show variables like '%slow_query_log_file%'
没有index的查询记录开关 show global variables like '%indexes%';
log_queries_not_using_indexes 是否开启记录没有index 的查询; log_throttle_queries_not_using_index 做日志记录的流量控制,一分钟可以记录多少条;默认 0 是不限制;
explain / desc
MySQL中执行explain或者desc命令查看慢查询语句,可以看出为什么SQL查询慢。如:
explain select * from dbname.tableName 或 desc select * from dbname.tableName
它的输出格式细节可以关注MySQL explain format,在输出中最要注意的是:
- type 字段值: system > const > eq_ref > ref > fulltext > ref_or_null > index_merge > unique_subquery > index_subquery > range > index > all 备注:ALL是效率最差;若type 值为 index 或 all,则需要优化 2.Extra 字段值:出现 Using filesort 以及 Using temporary,表示mysql 根本不能使用索引,效率会受到重大影响。应尽可能对此进行优化; 最主要是要关注在orderby和groupby。 Using filesort:表示mysql 会对结果使用一个外部索引排序,而不是从表里按索引次序读到相关内容。 Using temporary:表示mysql 对查询结果排序时使用临时表;常见于 order by 和 group by。
- key:是否有使用Key,key长度如何
Note: SQL优化是个很复杂的过程,有可能出现拆东墙补西墙的情况: 比如给数据库表加入了索引之后,确实查询快了,可是存储空间加多了,插入删除操作耗时也增加了; 如果在一个写多读少的系统中,执行这种优化可能会起到反效果。 所以优化完之后千万不能大意,要持续监控系统,防止出现引入新瓶颈的情况。
慢查询优化
这篇文章主要介绍了Mysql慢查询优化方法及优化原则,本文给大家介绍的非常详细,具有一定的参考借鉴价值 ,需要的朋友可以参考下
1、日期大小的比较,传到xml中的日期格式要符合'yyyy-MM-dd',这样才能走索引,如:'yyyy'改为'yyyy-MM-dd','yyyy-MM'改为'yyyy-MM-dd'【这样MYSQL会转换为日期类型】
2、条件语句中无论是等于、还是大于小于,WHERE左侧的条件查询字段不要使用函数或表达式或数学运算
3、WHERE条件语句尝试着调整字段的顺序提升查询速度,如把索引字段放在最前面、把查询命中率高的字段置前等
4、保证优化SQL前后其查询结果是一致的
5、在查询的时候通过将EXPLAIN命令写在查询语句前,测试语句是否有走索引【具体用法百度】
6、禁止使用SELECT * FROM操作,应只返回需要的字段,不需要的字段不要返回
7、可以尝试分解复杂的查询,在应用层面进行表关联,以此代替SQL层面的表关联
8、WHERE子句和ORDER BY子句涉及到的列建索引
9、避免在WHERE子句中对字段进行NULL判断【可以对表字段改造一下,字符串型字段默认值设置为空字符串,数字型字段默认值设置为0,日期型字段默认值设置为1990-01-01等】
10、避免在WHERE子句中使用!=或<>操作符
11、避免在WHERE子句中使用OR操作符
12、BETWEEN AND代替IN
13、LIKE '%abc%'不会走索引,而LIKE 'abc%'会走索引
14、避免对字段进行表达式操作
15、避免对字段进行函数操作
16、GROUP BY操作默认会对GROUP BY后面的字段进行排序,如果你的程序不需要排序,可在GROUP BY语句后面加上ORDER BY NULL去除排序
17、如果是数值型字段,则尽量设计为数值型字段,不要为了方便、为了偷懒而给后面维护的同事埋坑
18、表中所有字段设计为NOT NULL
19、返回条数固定时,用LIMIT语句限制返回记录的条数,如只需要一条记录,或肯定只有一条记录符合条件,那建议加上LIMIT 1
20、对于枚举类型的字段【即有固定罗列值的字段】,建议使用ENUM而不是VARCHAR,如性别、星期、类型、类别等
21、对于存IP地址的字段设计为成UNSIGNED INT型
22、避免在SQL中使用NOW()、CURDATE()、RAND()函数【因为这种方式会导致MYSQL无法使用SQL缓存】,可以转化为通过传入参数的方式
23、对于统计类的查询【如查询连续几个月的数据总量,或查询同比、环比等】,可以通过定时查询并统计到统计表的方式提高查询速度
安装innodb 引擎
检查是否已安装InnoDB引擎,未发现InnoDB相关信息。
xxxxxxxxxxmysql> show engines;+------------+---------+-----------------------------------------------------------+--------------+------+------------+| Engine | Support | Comment | Transactions | XA | Savepoints |+------------+---------+-----------------------------------------------------------+--------------+------+------------+| CSV | YES | CSV storage engine | NO | NO | NO || MRG_MYISAM | YES | Collection of identical MyISAM tables | NO | NO | NO || MEMORY | YES | Hash based, stored in memory, useful for temporary tables | NO | NO | NO || MyISAM | DEFAULT | Default engine as of MySQL 3.23 with great performance | NO | NO | NO |+------------+---------+-----------------------------------------------------------+--------------+------+------------+4 rows in set (0.00 sec)mysql> SHOW VARIABLES LIKE 'have_%';+-------------------------+-------+| Variable_name | Value |+-------------------------+-------+| have_community_features | YES || have_compress | YES || have_crypt | YES || have_csv | YES || have_dynamic_loading | YES || have_geometry | YES || have_innodb | NO || have_ndbcluster | NO || have_openssl | NO || have_partitioning | NO || have_query_cache | YES || have_rtree_keys | YES || have_ssl | NO || have_symlink | YES |+-------------------------+-------+14 rows in set (0.00 sec)
可以在编译安装时,在configrue的时候,加上 --with-plugins=innobase这个参数
如果之前已经安装过,也可补装innodb引擎 首先确定,在mysql的'plugin_dir'下有ha_innodb_plugin.so和ha_innodb.so两个文件
查询plugin的路径
xxxxxxxxxxmysql> show variables like 'plugin_dir';+---------------+-----------------------------------+| Variable_name | Value |+---------------+-----------------------------------+| plugin_dir | /usr/local/mysql/lib/mysql/plugin |+---------------+-----------------------------------+1 row in set (0.00 sec)
确认文件存在
xxxxxxxxxx[root@RHEL ~]# ll /usr/local/mysql/lib/mysql/plugin/ha_innodb_plugin.solrwxrwxrwx 1 root root 25 Nov 6 06:20 /usr/local/mysql/lib/mysql/plugin/ha_innodb_plugin.so -> ha_innodb_plugin.so.0.0.0[root@RHEL ~]# ll /usr/local/mysql/lib/mysql/plugin/ha_innodb.solrwxrwxrwx 1 root root 18 Nov 6 06:20 /usr/local/mysql/lib/mysql/plugin/ha_innodb.so -> ha_innodb.so.0.0.0
在mysql下安装InnoDB
xxxxxxxxxxmysql> INSTALL PLUGIN InnoDB SONAME 'ha_innodb.so';Query OK, 0 rows affected (0.75 sec)
检查,已经支持InnoDB了
xxxxxxxxxxmysql> mysql> show engines;+------------+---------+------------------------------------------------------------+--------------+------+------------+| Engine | Support | Comment | Transactions | XA | Savepoints |+------------+---------+------------------------------------------------------------+--------------+------+------------+| CSV | YES | CSV storage engine | NO | NO | NO || InnoDB | YES | Supports transactions, row-level locking, and foreign keys | YES | YES | YES || MEMORY | YES | Hash based, stored in memory, useful for temporary tables | NO | NO | NO || MyISAM | DEFAULT | Default engine as of MySQL 3.23 with great performance | NO | NO | NO || MRG_MYISAM | YES | Collection of identical MyISAM tables | NO | NO | NO |+------------+---------+------------------------------------------------------------+--------------+------+------------+5 rows in set (0.00 sec)mysql> SHOW VARIABLES LIKE 'have_%';+-------------------------+-------+| Variable_name | Value |+-------------------------+-------+| have_community_features | YES || have_compress | YES || have_crypt | YES || have_csv | YES || have_dynamic_loading | YES || have_geometry | YES || have_innodb | YES || have_ndbcluster | NO || have_openssl | NO || have_partitioning | NO || have_query_cache | YES || have_rtree_keys | YES || have_ssl | NO || have_symlink | YES |+-------------------------+-------+14 rows in set (0.00 sec)
主从同步
配置
注意:master和slave两节点间时间需同步。
一、从库必须能够访问主库
xxxxxxxxxxmysql -uroot -pGRANT ALL PRIVILEGES ON *.* TO 'root'@'%' IDENTIFIED BY '10jqka' WITH GRANT OPTION;flush privileges;
连接测试:
mysql -uroot -p10jqka -h192.168.1.243
二、修改配置 2.1、修改主库配置并重启
xxxxxxxxxx[mysqld]server-id=1log-bin=mysql-binbinlog-do-db=db_name //记录日志的数据库binlog-ignore-db=db_name //不记录日志的数据库,不必须
2.2、修改从库配置并重启
xxxxxxxxxx[mysqld]server-id=2master-host=192.168.1.243master-user=rootmaster-password=10jqkareplicate-do-db //指定需要复制的数据库,不必须replicate-ignore-db //复制时需要排除的数据库,不必须relay_log //中继日志的名字。复制线程需要先把远程的变化拷贝到这个中继日志中,再执行。不必须
三、创建数据库并同步 创建数据库 使用mysqldump等方法同步数据库 load data from master; //也可使用此方法,同步时不能往主数据库写入数据
四、启动同步
xxxxxxxxxxslave start; //启动同步
重启从数据库也能够进行同步
五、检查 检查备份是否正常
xxxxxxxxxxshow master status;show slave status\G
我们还是来重点解释途中的红圈的部分:
- Master_host 指的是主服务器的地址。
- Master_user 指的是主服务器上用来复制的用户。从服务器会用此账号来登录主服务,进行复制。
- Master_log_file 就是主服务器上的日志文件名。
- Read_Master_log_pos 就是前面提到的主服务器的日志记录位置,从服务器根据这两个条件来选择复制的文件和位置。
- Slave_IO_Running: 指的就是从服务器上负责读取主服务器的线程工作状态。从服务器用这个专门的线程链接到主服务器上,并把日志拷贝回来。
- Slave_SQL_Running: 指的就是专门执行sql的线程。它负责把复制回来的Relaylog执行到自己的数据库中。 注:5、6这两个参数必须都为Yes 才表明复制在正常工作。
六、双向同步 如果需要双向同步的话,需要再做一次从B到A的复制: 以上面的主服务器为起点,配置它的数据库同步到备服务器。这就是主-从复制了。之后再反过来做一次,就可以互相备份了。
需要增加的配置:
xxxxxxxxxxauto-increment-increment=10auto-increment-offset=1log-slave-updates=ON
解释一、 auto-increment-increment=10 auto-increment-offset=1
这两个用于在双主(多主循环)互相备份。因为每台数据库服务器都可能在同一个表中插入数据,如果表有一个自动增长的主键,那么就会在多服务器上出现主键冲突。解决这个问题的办法就是让每个数据库的自增主键不连续。
假设需要将来可能需要10台服务器做备份,所以auto-increment-increment设为10.而auto-increment-offset=1表示这台服务器的序号。从1开始,不超过auto-increment-increment。
这样做之后,我在这台服务器上插入的第一个id就是1,第二行的id就是11了,而不是2。(同理,在第二台服务器上插入的第一个id就是2,第二行就是12,这个后面再介绍)这样就不会出现主键冲突了。
解释二、 log-slave-updates=ON
中继日志执行之后,这些变化是否需要计入自己的binarylog。 当你的B服务器需要作为另外一个服务器的主服务器的时候需要打开。就是双主互相备份,或者多主循环备份。我们这里需要,所以打开。
故障恢复
mysql从库故障恢复步骤(删除数据重新同步)
一、主库备份
1、备份主数据库数据
xxxxxxxxxxmysqldump -hip -uusername -ppassword --single-transaction --master-data=1 --databases dbname > dbname.sql
备注:
--single-transaction 启用一个事务来进行备份操作,备份过程中不会对数据库进行锁操作 --master-data=1 备份必须加上此参数。当这个参数的值为1的时候,mysqldump出来的文件就会包括CHANGE MASTER TO这个语句,CHANGE MASTER TO后面紧接着就是file和position的记录,在slave上导入数据时就会执行这个语句,salve就会根据指定这个文件位置从master端复制binlog
二、从库恢复
1、查看slave状态
xxxxxxxxxxMySQL [table]> show slave status \G ;
2、停止slave状态,清除从库主从信息
xxxxxxxxxxMySQL [table]> stop slave; (停止从库)MySQL [table]> reset slave all; (取消从库和主从的关系)
3、将从库已同步主库数据库删除
xxxxxxxxxxMySQL [table]> DROP DATABASE DBNAME;
4、登录从数据库
xxxxxxxxxxMySQL [table]> mysql -hip -uusername -ppasswd -Pport
5、将备份文件导入到从服务器 将备份过来的数据导入到从服务器
xxxxxxxxxxMySQL [table] > CREATE DATABASE DBNAME;MySQL [table] >source /dbname.sql ;
导入之后查看数据是否导入成功
6、查看主服务器备份数据MASTER_LOG_FILE地址及MAST_LOG_POS位置
xxxxxxxxxxcat dbname.sql |grep "MASTER_LOG_FILE"
-- CHANGEMASTER TO MASTER_LOG_FILE='mysql-bin.000015', MASTER_LOG_POS=7334223423;
7、执行同步语句,这里填写的binlog日志文件及偏移量位置为第6步中的MASTER_LOG_FILE地址MAST_LOG_POS的值
xxxxxxxxxxCHANGE MASTER TO MASTER_HOST='192.168.1.1',MASTER_USER='rep',MASTER_PASSWORD='slavepass',MASTER_LOG_FILE='mysql-bin.000015',MASTER_LOG_POS=7334223423;
8、启动slave
xxxxxxxxxxMySQL [table] > start slave;
9、查看slave状态
xxxxxxxxxxMySQL[table]> show slave status \G ;
查看slave两个线程是否为YES状态
xxxxxxxxxxSlave_IO_Running:YesSlave_SQL_Running:Yes
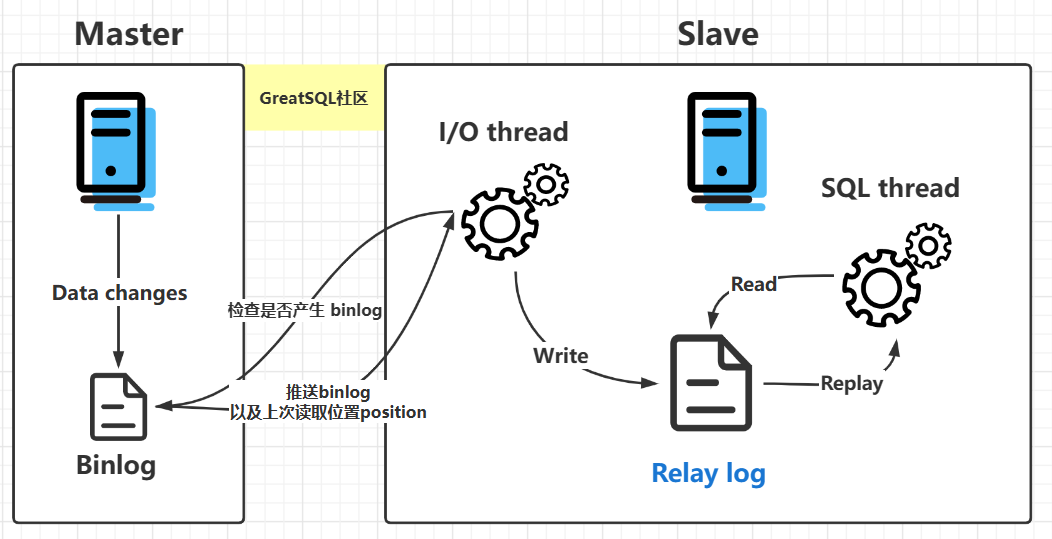
流程
MySQL 的主从复制是依赖于 binlog,也就是记录 MySQL 上的所有变化并以二进制形式保存在磁盘上二进制日志文件。
主从复制就是将 binlog 中的数据从主库传输到从库上,一般这个过程是异步的,即主库上的操作不会等待 binlog 同步地完成。
详细流程如下:
主库写 binlog:主库的更新 SQL(update、insert、delete) 被写到 binlog; 主库发送 binlog:主库启动dump线程Log Dump Thread 来发送 binlog 给从库; 从库写 中继日志relay log:从库在连接到主节点时会启动一个 IO 线程I/O Thread,以请求主库更新的 binlog,并且把接收到的 binlog 信息写入一个叫做 relay log 的中继日志文件; 从库回放:从库还会创建一个 SQL 线程SQL Thread读取 relay log 中的内容,并且在从库中做回放,最终实现主从的一致性。