Ansible

Ansible 是一个极其简单的 IT 自动化平台,可让您的应用程序和系统更易于部署和维护。从代码部署到网络配置再到云管理,使用 SSH 以接近纯英语的语言实现一切自动化,无需在远程系统上安装代理。
安装
xpip2 download -d . ansiblepip2 install --no-index --find-links=. -r requirements.txtpip3 download -d . ansiblepip3 install --no-index --find-links=. -r requirements.txt
分组
Ansible默认预定义了两个主机组:all分组和ungrouped分组。
all分组中包含所有分组内的节点 ungrouped分组包含所有不在分组内的节点 这两个分组都不包含localhost这个特殊的节点
分组嵌套
xxxxxxxxxx[nginx]192.168.200.27192.168.200.28192.168.200.29[apache]192.168.200.3[0:3][webservers:children]nginxapache[centos7:children]webserversmysql
剔除某主机
当前hosts文件配置:
xxxxxxxxxx[web]192.168.100.100[web1]192.168.100.102
案列1:将某主机组从all中剔除
xxxxxxxxxxcat ping1.yml- hosts: all:!web1 remote_user: root tasks: - name: test connecion ping:YAML中的字符串是可以不用使用引号包围的,但是如果包含了特殊符号,则需要使用引号包围。
单引号包围字符串时,会将特殊符号保留。
双引号包围字符串时,反斜线需要额外进行转义。
例如,下面几对书写方式是等价的:
xxxxxxxxxxkey1"~"key2'~'key3'\.php$'key4"\\.php$"key5\.php$key6\nkey7'\n'key8"\\n"xxxxxxxxxx[ { "key1": "~" }, { "key2": "~" }, { "key3": "\\.php$" }, { "key4": "\\.php$" }, { "key5": "\\.php$" }, { "key6": "\\n" }, { "key7": "\\n" }, { "key8": "\\n" }]sed
[WARNING]: Consider using the replace, lineinfile or template module rather than running 'sed'. If you need to use command because replace, lineinfile or template is insufficient you can add 'warn: false' to this command task or set 'command_warnings=False' in ansible.cfg to get rid of this message.
xxxxxxxxxx- hosts: allremote_user: roottasks:- name: 预览修改/etc/ansible/hostsshell: sed -n 's/\(^{{ inventory_hostname }} .*\)/\1 hostname={{shell_result.stdout_lines[0]}}/p' /etc/ansible/hostsargs:warn: false
throttle: 1
执行local修改文件时,加上throttle: 1,否则会发生修改丢失的情况
xxxxxxxxxx- name: 修改/etc/ansible/hostsshell: sed -i 's/\(^{{ inventory_hostname }} .*\)/\1 hostname={{shell_result.stdout_lines[0]}}/g' /etc/ansible/hostsargs:warn: falseconnection: localthrottle: 1
源码修改
自定义ansible的输出格式
xxxxxxxxxxfind . -name "*.py" | xargs grep ">>" > ~/you.txt./plugins/callback/minimal.py: buf = "%s | %s | rc=%s >>\n" % (host, caption, result.get('rc', -1))
修改: /usr/lib/python2.7/site-packages/ansible/plugins/callback/minimal.py
加密弃用警告 CryptographyDeprecationWarning
xxxxxxxxxx[root@JZVM-200-101 ~]# ansible kvm -m shell -a 'virsh list --all'/usr/lib/python2.7/site-packages/ansible/parsing/vault/__init__.py:41: CryptographyDeprecationWarning: Python 2 is no longer supported by the Python core team. Support for it is now deprecated in cryptography, and will be removed in a future release.from cryptography.exceptions import InvalidSignature
修改: /usr/lib64/python2.7/site-packages/cryptography/__init__.py
弃用警告: DEPRECATION WARNING
xxxxxxxxxx[root@JZVM-200-101 ansible]# ansible kvm -m shell -a 'virsh list --all'[DEPRECATION WARNING]: Distribution centos 8.2.2004 on host 192.168.200.104 should use /usr/libexec/platform-python, but is using/usr/bin/python for backward compatibility with prior Ansible releases. A future Ansible release will default to using thediscovered platform python for this host. See https://docs.ansible.com/ansible/2.9/reference_appendices/interpreter_discovery.htmlfor more information. This feature will be removed in version 2.12. Deprecation warnings can be disabled by settingdeprecation_warnings=False in ansible.cfg.
查找告警文字
xxxxxxxxxxfind . -name "*.py" |xargs grep "for backward compatibility with prior Ansible releases"[root@JZVM-200-101 ansible]# find . -name "*.py" |xargs grep "for backward compatibility with prior Ansible releases"./executor/interpreter_discovery.py: u"/usr/bin/python for backward compatibility with prior Ansible releases. "[root@JZVM-200-101 ansible]#
修改/usr/lib/python2.7/site-packages/ansible/executor/interpreter_discovery.py
或在ansible.cfg添加参数:
xxxxxxxxxx[defaults]interpreter_python = auto_silent
ansible不支持腾讯云 hostname:
参考: https://stackoverflow.com/questions/41999534/ansible-hostname-module-adding-os-support
xxxxxxxxxxfatal: [10.1.5.18]: FAILED! => {"ansible_facts": {"discovered_interpreter_python": "/usr/bin/python"}, "changed": false, "msg": "hostname module cannot be used on platform Linux (Tlinux)"}
因为 /usr/lib/python2.7/site-packages/ansible/modules/system/hostname.py 30行 platform.system() 为 'Linux' distribution = distro.id().capitalize() 为 "Tlinux" 不被支持
修改 /usr/lib/python2.7/site-packages/ansible/modules/system/hostname.py,在:
xxxxxxxxxxclass CentOSHostname(Hostname):platform = 'Linux'distribution = 'Centos'strategy_class = RedHatStrategy
下面添加:
xxxxxxxxxxclass TlinuxHostname(Hostname):platform = 'Linux'distribution = 'Tlinux'strategy_class = RedHatStrategy
ansible详细教程
更新时间:2016年02月16日 10:02:07 作者:421389904
这篇文章主要介绍了自动化运维工具ansible的使用详细教程的相关资料,需要的朋友可以参考下
一、ansible简介
1.ansible
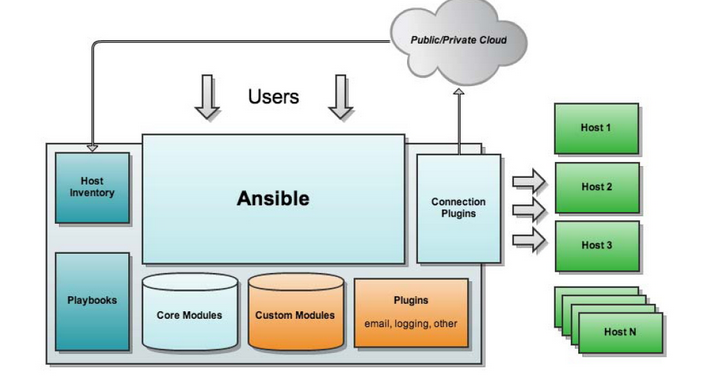
ansible是新出现的自动化运维工具,基于Python研发。糅合了众多老牌运维工具的优点实现了批量操作系统配置、批量程序的部署、批量运行命令等功能。仅需在管理工作站上安装ansible程序配置被管控主机的IP信息,被管控的主机无客户端。ansible应用程序存在于epel(第三方社区)源,依赖于很多python组件。主要包括:
(1)、连接插件connection plugins:负责和被监控端实现通信;
(2)、host inventory:指定操作的主机,是一个配置文件里面定义监控的主机;
(3)、各种模块核心模块、command模块、自定义模块;
(4)、借助于插件完成记录日志邮件等功能;
(5)、playbook:剧本执行多个任务时,非必需可以让节点一次性运行多个任务。
参考站点:http://www.ansible.com.cn
2.ansible特性
模块化设计,调用特定的模块来完成特定任务,本身是核心组件,短小精悍;
基于Python语言实现,由Paramiko(python的一个可并发连接ssh主机功能库), PyYAML和Jinja2(模板化)三个关键模块实现;
部署简单,agentless无客户端工具;
主从模式工作;
支持自定义模块功能;
支持playbook剧本,连续任务按先后设置顺序完成;
期望每个命令具有幂等性:
3.ansible架构
ansible core:ansible自身核心模块 host inventory:主机库,定义可管控的主机列表 connection plugins:连接插件,一般默认基于ssh协议连接 modules:core modules(自带模块)、custom modules(自定义模块) playbooks:剧本,按照所设定编排的顺序执行完成安排任务
4.配置文件:
(1)ansible应用程序的主配置文件:/etc/ansible/ansible.cfg (2) Host Inventory定义管控主机:/etc/ansible/hosts
遵循INI风格;中括号中的字符是组名;一个主机可同时属于多个组;
示例:
xxxxxxxxxx# Ex 1: Ungrouped hosts, specify before any groupheaders.直接在任何组的头部前面指定,不属于任何组的主机green.example.comblue.example.com192.168.100.1192.168.100.10# Ex 2: A collection of hosts belonging to the'webservers' group;一批主机属于一个组,例如定义为'webservers'的组[webservers]alpha.example.orgbeta.example.org192.168.1.100192.168.1.110
注意:默认是以root用户执行,但是基于ssh连接操作要多次输入密码,为方便可以使用基于ssh密钥方式进行认证
二、ansible应用程序命令
1.ansible-doc命令:获取模块列表,及模块使用格式;
xxxxxxxxxxansible-doc -l:获取列表ansible-doc -s module_name:获取指定模块的使用信息
2.ansible命令格式
xxxxxxxxxxansible <host-pattern> [-f forks] [-m module_name] [-a args]<host-pattern>
| host-pattern | 指明管控主机,以模式形式表示或者直接给定IP,必须事先定义在文件中;all设置所有 |
|---|---|
| [-f forks] | 指明每批管控多少主机,默认为5个主机一批次 |
| [-m module_name] | 使用何种模块管理操作,所有的操作都需要通过模块来指定 |
| [-a args] | 指明模块专用参数;args一般为key=value格式注意:command模块的参数非为kv格式,而是直接给出要执行的命令即可; |
注意:command模块的参数非为kv格式,而是直接给出要执行的命令即可;
注意:
-iPATH, --inventory=PATH:指明使用的host inventory文件路径;
3.常用模块(module_name):
xxxxxxxxxx1)command:默认模块,可省略。在远程主机上进行操作命令-a 'COMMAND'注意:comand模块的参数非key=value格式,直接给出要执行的命令[root@localhost ~]# ansible all -m command -a 'ifconfig'2)user:-a 'name= state={present(创建)|absent(删除)} force=(是否强制操作删除家目录) system= uid= shell= home='[root@localhost ~]# ansible all -m user -a 'name=ansible state=present'3)group:-a 'name= state={present|absent} gid= system=(系统组)'[root@localhost ~]# ansible all -m group -a 'name=mygroup state=presentsystem=true'4)cron:-a 'name= state= minute= hour= day= month= weekday= job='[root@localhost ~]# ansible all -m cron -a 'name='Time' state=presentminute='*/5' job='/usr/sbin/ntpdate 172.168.0.1 &> /dev/null''5)ping:无参数[root@localhost ~]# ansible all -m ping6)file:文件管理-a 'path= mode= owner= group= state={file|directory|link|hard|touch|absent} src=(link,链接至何处)'[root@localhost ~]# ansible all -m file -a 'path=/tmp/testdirstate=directory'[root@localhost ~]# ansible all -m file -a 'path=/tmp/test.txt state=touchmod=600 owner=user1'7)copy:-a 'dest=(远程主机上路径) src=(本地主机路径) content=(直接指明内容) owner= group= mode='[root@localhosttmp]# ansible web -m copy -a 'src=/etc/yum.repos.d/aliyun.repodest=/etc/yum.repos.d/'8)template-a 'dest= src='#'" content= owner= group= mode='9)yum:-a 'name= conf_file=(指明配置文件) state={present|latest|absent} enablerepo= disablerepo='[root@localhost ~]# ansible all -m yum 'name=httpd state=present'10)service:-a 'name= state={started|stopped|restarted} enabled=(是否开机自动启动) runlevel='[root@localhost ~]# ansible all -m service -a 'name=httpd state=started'11)shell:-a 'COMMAND' 运行shell命令[root@localhost ~]# ansible all -m shell -a 'echo "123456789" |passwd --stdin user1'12)script:-a '/PATH/TO/SCRIPT'运行脚本[root@localhost ~]# ansible all -m script -a '/tmp/a.sh'13)setup:获取指定主机的facts变量;[root@localhost ~]# ansible all -m setup

三、Playbooks剧本
1.playbook组织格式:YAML语言格式
playbooks是ansible更强大的配置管理组件,实现基于文本文件编排执行的多个任务,且多次重复执行
(1)YAML简介
YAML:YAML Ain't Markup Language; Yet Another Markup Language;
类似于半结构化数据,声明式配置;可读性较高的用来表达资料序列的格式,易于与脚本语言交互 官方站点:http://www.yaml.org
(2)语法格式
1)任何书记结构都用缩进来标识,可以嵌套 2)每一行是一个键值数据key:value,冒号隔开。若想在一行标识需要用{ }和,分隔格式 3)列表用 - 标识
2.inventory参数:主机库ssh参数设置
ansible基于ssh连接inventory中指定的远程主机时,将以此处的参数指定的属性进行;
| ansible_ssh_port | 指定ssh端口 |
|---|---|
| ansible_ssh_user | 指定ssh用户 |
| ansible_ssh_pass | 指定ssh用户登录是认证密码,明文密码不安全 |
| ansible_sudo_pass | 指明sudo时候的密码 |
实例:
[websrvs]
192.168.0.101 ansible_ssh_port=22 ansible_ssh_user=root ansible_ssh_pass=xuding 192.168.0.102
注意:在/etc/ansible/hosts中直接定义连接时候的密码不安全,一般建议基于ssh的密钥认证方式实现
3.playbooks
(1)核心元素
Tasks任务、Variables变量、Templates模板、Handlers处理器、Roles角色
(2)playbooks中定义任务:
- name: task description 注释描述信息 module_name: module_args 声明模块:定义ansible模块参数

(3)ansible-playbook执行命令:
ansible-playbook <filename.yml> ... [options]

4.playbook--- 变量
(1)变量命名:字母、数字和下划线组成,仅能以字母开头;
(2)变量种类:
1)facts:由远程主机发回的主机特有的属性信息,这些信息被保存在ansible变量中;无须声明,可直接调用;
2)自定义变量: 通过命令行传递:ansible-playbook test.yml --extra-vars "host=www user=test" 通过roles传递
3)主机变量:定义在inventory中的主机之后的变量;直接传递给单个主机的变量
实例:
xxxxxxxxxx[root@localhost ~]# vim /etc/ansible/hosts中直接定义在主机之后[web]192.168.0.101 host=mail192.168.0.102192.168.0.103
4)组变量:定义在inventory中的组上的变量(例如在默认的文件/etc/ansible/hosts上编辑)
xxxxxxxxxx[group_name:vars]var1=valuevar2=value
注意:组名要事先存在,实例如下:
xxxxxxxxxx[websrvs]192.168.0.101192.168.0.102[websrvs:vars]host=mail
变量使用示例:
xxxxxxxxxx[root@localhost~]# vim useradd.yml- hosts: websrvsremote_user: rootvars:username: testuserpassword: xudingtasks:-name: add useruser: name={{ username }} state=present-name: set passwordshell: /bin/echo {{ password }} |/usr/bin/passwd --stdin {{ username }}
注释:
- {{ }} 调用变量
- #ansible-playbook /PATH/TO/SOME_YAML_FILE { -eVARS|--extra-vars=VARS} 变量的重新赋值调用方法
xxxxxxxxxx[root@localhost ~]# ansible-playbook useradd.yml --extra-vars "username=ubuntu"
5.playbook--- tasks
(1)条件测试:
在某task后面添加when子句即可实现条件测试功能;when语句支持Jinja2语法; 实例:当时RedHat系列系统时候调用yum安装
tasks:
xxxxxxxxxx-name: install web server packageyum: name=httpd state=presentwhen: ansible_os_family == "RedHat"
(2)迭代:item
在task中调用内置的item变量;在某task后面使用with_items语句来定义元素列表;
tasks:
xxxxxxxxxx-name: add four usersuser: name={{ item }} state=presentwith_items:-testuser1-testuser2-testuser3-testuser4
注意:迭代中,列表中的每个元素可以为字典格式;
实例:
xxxxxxxxxx-name: add two usersuser: name={{ item.name }} state=present groups={{ item.groups }}with_items:- { name: 'testuser5', groups: 'wheel' }- { name: 'testuser6', groups: 'root' }
6.playbook--- handlers:处理器;触发器
只有其关注的条件满足时,才会被触发执行的任务; 实例:配置文件发生改变触发重启服务
xxxxxxxxxx-hosts: websrvsremote_user: roottasks:-name: install httpdyum:name=httpd state=present-name: install config filecopy: src=/root/httpd.confdest=/etc/httpd/conf/httpd.confnotify: restart httpd-name: start httpd serviceservice: name=httpd state=startedhandlers:-name: restart httpdservice: name=httpd state=restarted
7.playbook模板
templates: 用于生成文本文件(配置文件);模板文件中可使用jinja2表达式,表达式要定义在{{}},也可以简单地仅执行变量替换;
roles:
xxxxxxxxxxroles用于实现“代码复用”;roles以特定的层次型格式组织起来的playbook元素(variables,tasks, templates, handlers);可被playbook以role的名字直接进行调用;用法:在roles/下建立[group_name]子目录,并非全部都要创建;例如:/etc/ansible/roles/(在/etc/ansible/ansible.cfg定义roles目录)webserver/files/:此角色中用到的所有文件均放置于此目录中;templates/:Jinja2模板文件存放位置;tasks/:任务列表文件;可以有多个,但至少有一个叫做main.yml的文件;handlers/:处理器列表文件;可以有多个,但至少有一个叫做main.yml的文件;vars/:变量字典文件;可以有多个,但至少有一个叫做main.yml的文件;meta/:此角色的特殊设定及依赖关系;
authorized_key模块
常用参数 (=号后面的强制要求):
- = key
指定 ssh 公钥,搭配 lookup 使用从文件中读取公钥 实例:
authorized_key: key="{{ lookup('file', '~/.ssh/id_rsa.pub') }}" state=present user=root
- state
present 表示添加指定 key 到 authorized_keys 文件中
absent 表示从 authorized_keys 文件中移除指定 key [Default: present]
- = user
将密钥分发给目标主机上的哪个用户,默认会将公钥写入目标主机的
/home/USERNAME/.ssh/authorized_keys文件中
- exclusive
是否移除 authorized_keys 文件中其它非指定 key [Default: no] type: bool version_added: 1.9
- key_options
附加到 key 中的字符串 [Default: (null)] version_added: 1.4
- manage_dir
指定模块是否应该管理 authorized key 文件所在的目录 [Default: yes] type: bool version_added: 1.2
- path
authorized_keys 文件存放的位置 [Default: ~/.ssh/authorized_keys] version_added: 1.2
实例:
xxxxxxxxxx# 需要输入主机的密码,若是有的主机密码不一致,那么该主机会分发失败,此时只需再执行一遍命令输入该主机密码即可。ansible all -m authorized_key -a "user=root key='{{ lookup('file', '/root/.ssh/id_rsa.pub') }}'" --ask-pass -c paramikoansible-playbook authorizedkey.yml --ask-pass -c paramiko# file: authorizedkey.yml---- hosts: alltasks:- name: Adds or removes an SSH authorized keyauthorized_key:user: rootstate: presentkey: "{{ lookup('file', '~/.ssh/id_rsa.pub') }}"
最后编辑于 :2020.12.14 11:38:16
lookup插件
发布于 2020-08-28 18:07:01
Ansible playbook允许用户使用自定义的变量,不过当变量过大,或者太复杂时,无论是在playbbok中通过vars定义,还是在单独的变量文件中定义,可读性都比较差,而且不够灵活。
有了lookup就可以解决这类难题,lookup既能够读取Ansible管理节点上文件系统的文件内容到Ansible变量中,也可以读取配置的数据库中的内容。
lookup使用案例
- lookup读取ansible管理节点上的/root/testfile文件的内容, 并将其内容赋值给contents变量。
xxxxxxxxxx---- hosts: all remote_user: root tasks: vars: contents: "{{ lookup('file','/root/testfile')}}" tasks: - debug: msg="the content of file /root/testfile is {{contents}}"上面的例子contents: "{{ lookup('file','/root/testfile')}}"使用file类型的lookup,是最简单的lookup的用法。
- lookup 生成随机的密码
password lookup会随机生成一个密码,并将这个密码写入到参数指定的文件中。如下示例,创建一个名为bob的mysql用户,并随机生成该用户的密码,并将密码写入到主控端的bob-password.txt中:
xxxxxxxxxx---- hosts: all remote_user: root tasks: - name: create deploy mysql user mysql_user: name=bob password={{ lookup('password', 'bob-password,txt')}} priv=*.*:ALL state=present- lookup读取环境变量
env类型的lookup可以读取Linux上的环境变量
xxxxxxxxxx---- hosts: all remote_user: root tasks: - debug: msg="{{ lookup('env','HOME')}} is $HOME result"- lookup读取Linux命令的执行结果
pipe类型的lookup可以将Linux上命令的执行结果读取到Ansible中:
xxxxxxxxxx---- hosts: all remote_user: root tasks: - debug: msg="{{ lookup('pipe','date')}} is the raw result of running this command"5.lookup读取配置文件
lookup支持读取两种类型的配置文件:ini和Java的Properties
ini类型的lookup默认读取配置文件的类型是ini。
假设有ini类型的配置文件如下:
xxxxxxxxxx[info]website=www.jellythink.comauthor=Yanggd
config.properties内容:
xxxxxxxxxxinfo.website=www.jellythink.cominfo.author=Yanggd
先看看怎么读取ini配置文件:
xxxxxxxxxx---- hosts: '192.168.5.3'gather_facts: Falsevars:iniValue: "{{lookup('ini', 'website section=info file=info.ini')}}"tasks:- name: inidebug: msg="{{iniValue}}"
看看怎么读取properties配置文件:
xxxxxxxxxx---- hosts: '192.168.5.3'gather_facts: Falsevars:propertiesValue: "{{lookup('ini', 'info.website type=properties file=info.properties')}}"tasks:- name: inidebug: msg="{{propertiesValue}}"
读取properties时,需要说明type为properties。
6.lookup读取CSV文件的指定单元
csvfile可以从.csv文件中读取一个条目。假设我们有如下示例的名为users.csv的文件:
xxxxxxxxxxusername,emaillorin,lorin@test.comjohn,john@example.comsue,sue@exmaple.com下面是一个使用csvfile lookkup提取sue的电子邮件地址的task示例:
xxxxxxxxxx- name: get sue's emaildebug: msg="{{ lookup('csvfile','sue file=users.csv delimiter=, col=1')}}"可以看到,一共向插件传递了四个参数:sue, file=users.csv, delimiter=,以及col=1。说明如下:
- 第一个参数指定一个名字,该名字必须出现在其所在行的第0列,需要说明的是,如果指定的第一个参数名字在文件中出现多次,则匹配第一次出现的结果
- 第二个参数指定csv文件的文件名
- 第三个参数指定csv文件的中条目的分隔符,
- 第四个参数指定要取得哪一列的值,这一列正是第一个参数所在行的那一列的值
| 参数 | 默认值 | 描述 |
|---|---|---|
| file | ansible.csv | 要加载的文件名称 |
| col | 1 | 要输出的列,索引从0开始 |
| delimiter | TAB | 文件的分隔符 |
| default | empty string | 如果key不在csv文件中,则为默认返回值 |
| encoding | utf-8 | 使用的CSV文件的编码(字符集)(added in version 2.1) |
- lookup读取DNS解析的值
dig类型的lookup可以向DNS服务器查询指定域名的DNS记录。它可以查询任何DNS记录,包括正向查询和反向查询。
xxxxxxxxxx- debug: msg="The IPv4 address for example.com. is {{ lookup('dig', 'example.com.')}}"- debug: msg="The TXT record for example.org. is {{ lookup('dig', 'example.org.', 'qtype=TXT') }}"- debug: msg="The TXT record for example.org. is {{ lookup('dig', 'example.org./TXT') }}"今天我们先介绍到这里,未完待续!
ansible与saltstack对比
前一段时间用了saltstack,免不得要谈一下他们的优缺点。两者都是安装和使用都非常方便的批量管理软件。
1、salt要安装agent;ansible不需要,通过ssh连接,省掉装agent的事。
2、salt在server端要启进程;ansible不需要,但这都无所谓差不多。
3、salt与ansible都有模块,可使用任意语言开发模块。
4、salt与ansible都使用yaml语言格式编写剧本。
ansible由于走的是ssh,所以它有认证的过程,以及加密码的过程,这使得ansible非常慢,不适用于大规模环境(指上千台)。
为什么我放弃salt呢,首先服务器不多(百台左右),其次,salt的master端与minion端TCP连接经常断开,导致有时执行命令时会漏机器,这简直让我忍无可忍。听说最新版的salt好了很多,但由于公司系统是定制的,安装软件特别麻烦(15M的系统,解决依赖就是个大问题),我还是选择了ansible。
以上所述是小编给大家介绍的自动化运维工具ansible的使用详细教程,希望对大家有所帮助。